- Author: RhadigarTV
- Date: February 10, 2022
- Updated: April 12, 2022
- Expansion: TBC Classic


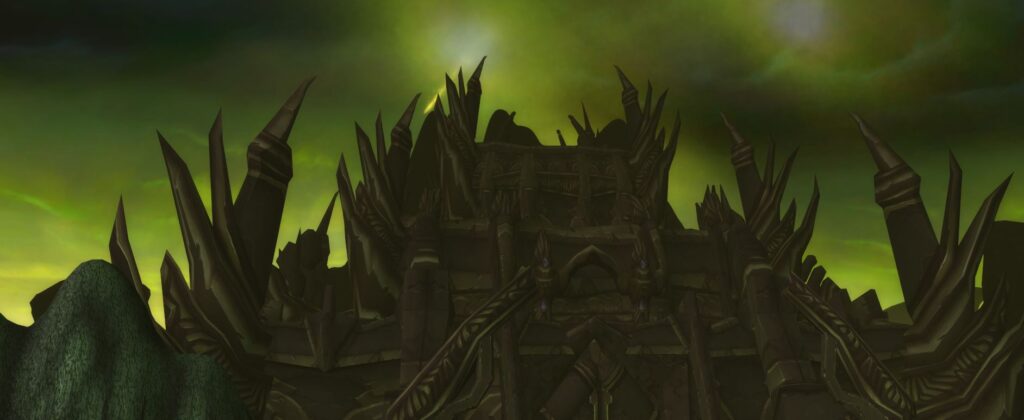
Greetings and welcome to our strategy guide for the Black Temple in World of Warcraft: The Burning Crusade Classic! Located on the eastern end of Shadowmoon Valley, Black Temple is the second and last raid being released with Phase 3. Unlike Tempest Keep and Serpentshrine Cavern, both Mount Hyjal and Black Temple are home to the start of Tier 6 gear. Black Temple consists of a total of 9 bosses that begins with High Warlord Naj’entus and ending with Illidan Stormrage. Just like Mount Hyjal, progression through this raid is linear and none of the bosses within are optional.
This guide aims to help you understand how best to prepare yourself and your raid group for Black Temple by giving you an overview of each encounter, providing an in-depth explanation of each boss, discussing positioning and how you can set yourself up for success. We will also cover the attunement process and how you can reach the entrance.
You can find a full list of Black Temple loot in our loot tool.
Attunement Process
Before being able to enter Black Temple, every member of your raid must reach level 70, declare allegiance with either The Aldors or The Scryers and complete the lengthy quest chain. In addition to these requirements, you will need be attuned with both The Arcatraz and Hyjal Summit.
If you’re looking for an in-depth explanation of the process, please check out our full-length Black Temple Attunement Guide!
Finding the Entrance to the Black Temple
Players will be guided to the location of the Black Temple when completing the attunement quest chain. The final quest in the quest chain, A Distraction for Akama, will lead you to the entrance of the Black Temple.
There is no big, grand entrance to the raid itself but is instead located in a crack in the wall. When entering, players will be ported into the Karabor Sewers. Keep in mind, Once you have upgraded Medallion of Karabor into Blessed Medallion of Karabor, it will teleport you directly to the entrance of the raid.
Raid Preparation
The Black Temple is a 25-man raid in The Burning Crusade Classic. Unlike Serpentshrine Cavern and Tempest Keep, Black Temple requires players to follow a linear order in defeating each boss. The bosses that can be found within the Black Temple are:
- High Warlord Naj’entus
- Supremus
- Shade of Akama
- Teron Gorefiend
- Gurtogg Bloodboil
- Reliquary of Souls
- Illidari Council
- Illidan Stormrage
Trash Mobs
The Black Temple is a large raid that consists of 9 boss encounters and varying amounts of trash mobs between each boss within. The types of trash that you will encounter consist of Beast, Humanoid, Demon, Mechanical and Undead enemies that will need to be cleared before the next boss. The tables below will show you not only what you will be encountering but what each trash mob has for abilities as well.
Boss Encounters
High Warlord Naj’entus
- Tanks:
- Move Naj’entus to his designated position and keep him there, facing away from the raid.
- Use personal defensive cooldowns just before Tidal Burst to increase your chances of survival.
- It doesn’t hurt to have an off-tank racing for threat in case the main tank dies.
- Healers:
- This fight is largely about how good you are at staying focused and healing people who need it the most.
- Spread out as much as possible — never be within 6 yards of another player.
- Raid Healers: Everyone in the raid will need ~6000 HP at all times, to survive Impaling Spine.
- Raid Healers: Everyone in the raid will need ~9000 HP to survive Tidal Burst.
- Priests: Use Power Word: Shield before Tidal Burst on people who don’t have at least 9000 max HP.
- Ranged DPS:
- Use your personal DPS cooldowns during Heroism / Bloodlust for maximum DPS.
- Spread out as much as possible — never be within 6 yards of another player.
- Mages: Use Frost Ward to increase your chances of surviving Tidal Burst.
- Melee DPS:
- Use your personal DPS cooldowns during Heroism / Bloodlust for maximum DPS.
- Make sure you know which of the 2 melee stacks you should be standing on for this fight.
- Arms Warriors: Make sure the Mortal Strike debuff is up when Naj’entus casts Tidal Shield.
- Rogues: If your raid has no Arms Warriors, use Wound Poison for this fight.
- Warriors: Consider leaving Berserker Stance until Tidal Burst has been cast.
Check out an in-depth breakdown in our High Warlord Naj’entus Strategy Guide!
Supremus
- Tanks:
- Phase One:
- Stay away from other tanks, but in front of the boss, to avoid having to move because of Molten Flame.
- If you get targeted by Molten Flame, call it out on voice chat ASAP so your raid can react quickly.
- Main Tank: Use survival cooldowns if either of your assigned healers get targeted by Molten Flame.
- Phase Two:
- You don’t have any particular task for this phase — just stay alive.
- Main Tank: Do as much threat as you can right after the Phase 2 -> Phase 1 transition, as threat resets.
- Phase One:
- Healers:
- Phase One:
- If you’re assigned to tank healing, be proactive with your heals.
- If your assigned tank has to move out because of Molten Flame, focus your heals on the other offtank.
- Druids: This is your time to shine — keep all of your healing-over-time spells on all tanks at all times.
- Phase Two:
- Success during this phase depends almost entirely on your ability to stay focused — no pressure though.
- You really need to spread out in this phase in order to avoid having to move around too much.
- Don’t panic and stop healing while moving around — people will die.
- Prioritize healing people with instant-cast spells like Circle of Healing, Swiftmend, Holy Shock, etc.
- Use cooldowns like Desperate Prayer, Nature’s Swiftness etc to survive if you take any damage here.
- Phase One:
- Ranged DPS:
- Phase One:
- Use your personal DPS cooldowns during this phase for maximum DPS.
- Spread out as much as possible to avoid having to move during this phase.
- Hunters: Use Misdirection on the main tank every time this phase starts.
- Warlocks: Make sure high priority players in your raid, like your Holy Priests, are Master Soulstoned.
- Phase Two:
- Don’t get greedy, trying to DPS close to a Volcanic Geyser — you’ll die.
- Phase One:
- Melee DPS:
- Phase One:
- Use your personal DPS cooldowns during this phase for maximum DPS.
- Stand at maximum melee range, away from your fellow melee DPS players.
- Phase Two:
- Don’t even try to DPS Supremus if a Volcanic Geyser happens to spawn on top of him — you’ll die.
- Phase One:
Check out an in-depth breakdown in our Supremus Strategy Guide!
Shade of Akama
- Tanks:
- Phase One:
- Keep the mobs away from the DPS & the Ashtongue Channeler.
- Use defensive cooldowns if necessary to survive having too many mobs on you all at once.
- Interrupt the Ashtongue Elementalist‘s casts.
- Do not chase the Ashtongue Sorcerers — they cannot be tanked.
- Phase Two:
- You have not won yet — keep paying attention, you likely have a lot of adds on you at this point.
- Do not hesitate to use a major defensive cooldown in order to survie and ensure a kill.
- Phase One:
- Healers:
- Phase One:
- Paladins, Druids and Shamans: Dispel Debilitating Poison off your tank.
- If you’re assigned to tank healing, don’t be complacent if they’re taking low damage, keep healing.
- The more adds your tank has on them, the larger a potential damage spike could.
- Phase Two:
- You have not won yet — keep healing your tank, they likely have a lot of adds on them.
- Phase One:
- Ranged DPS:
- Phase One:
- Kill the Ashtongue Channelers one by one, going in a clockwise pattern.
- Kill any Ashtongue Sorcerers that spawn to take the place of dead Ashtongue Channelers.
- If your class has strong AoE spells like Seed of Corruption, this is your chance to shine.
- Hunters & Mages: Help slow down the adds using Frost Trap, Blizzard etc if your raid asks you to.
- Phase Two:
- Phase One:
- Melee DPS:
- Phase One:
- Kill the Ashtongue Channelers one by one, going in a clockwise pattern.
- Kill any Ashtongue Sorcerers that spawn to take the place of dead Ashtongue Channelers.
- Phase Two:
- Phase One:
Check out an in-depth breakdown in our Shade of Akama Strategy Guide!
Teron Gorefiend
- Tanks:
- Move Teron to the correct position & turn him so he faces the balcony rather than the door.
- You have the easiest job here, just stand still and do as much threat as possible.
- Use a defensive cooldown if multiple healers have died to Shadow of Death.
- Protection Paladins: Help dispel Incinerate with your Cleanse if you’re not main tanking.
- Healers:
- Have your back against the balcony wall.
- You will need to be very quick with reacting to raid damage.
- Players afflicted with the Crushing Shadows debuff will need even more attention & faster healing.
- Paladins, Priests: Focus on dispelling Incinerate above anything else.
- Ranged DPS:
- Use your personal DPS cooldowns during Heroism / Bloodlust for maximum DPS.
- Have your back against the balcony wall.
- Warlocks: Use your Master Soulstone on players targeted by Shadow of Death.
- Melee DPS:
Check out an in-depth breakdown in our Teron Gorefiend Strategy Guide!
Reliquary of Souls
- Tanks:
- Phase One:
- You have about 10 seconds to move Gurtogg to the correct spot and turn him accordingly.
- The off-tanks should go as hard with threat as they can, while the main tank doesn’t get too far ahead.
- Main Tank: Stop doing more threat if you’re too far ahead of the other tanks.
- Main Tank: Stop doing more threat if you have10 stacks of Acidic Wound or more, wait for tank swap.
- Off-Tank: Announce on voice chat if the boss is on you, to help your healers out
- Protection Paladins: Use Divine Shield to remove your Acidic Wound as instructed by the raid leader.
- Phase Two:
- You cannot tank Gurtogg during this phase, so just go all-out with DPS.
- Main Tank: Be ready to pick up Gurtogg ASAP as soon as Fel Rage ends, use cooldowns if necessary.
- Phase One:
- Healers:
- Phase One:
- If you’re assigned to tank healing, always keep an eye out on who Gurtogg is currently attacking.
- Quickly swap to the new tank after a tank swap — Gurtogg does a lot of damage, don’t slack.
- Phase Two:
- All but 1 healer should be healing the Fel Rage player.
- Spam quick heals on them, don’t cheap out with mana.
- You will need to heal even harder when they get debuffed by Arcing Smash or Fel-Acid Breath.
- Use cooldowns like Nature’s Swiftness if necessary to keep them alive.
- Switch back to healing your Phase 1 target when Fel Rage ends, particularly as a tank healer.
- Phase One:
- Ranged DPS:
- Melee DPS:
- Phase One:
- Stack up behind one of Gurtogg’s sides (left/right) with the other melee DPS at all times.
- Move to the opposite side (left -> right) if you get targeted by Fel-Acid Breath.
- Don’t be in front of Gurtogg, ever.
- Rogues: Use Cloak of Shadows to dispel Fel-Acid Breath off yourself.
- Phase Two:
- Phase One:
Check out an in-depth breakdown in our Reliquary of Souls Strategy Guide!
Gurtogg Bloodboil
- Tanks:
- Phase One:
- Main Tank: Stop doing more threat if you’re too far ahead of the other tanks.
- Main Tank: Stop doing more threat if you have10 stacks of Acidic Wound or more, wait for tank swap.
- Off-Tank: Announce on voice chat if the boss is on you, to help your healers out.
- Protection Paladins: Use Divine Shield to remove your Acidic Wound as instructed by the raid leader.
- Phase Two:
- You cannot tank Gurtogg during this phase, so just go all-out with DPS.
- Main Tank: Be ready to pick up Gurtogg ASAP as soon as Fel Rage ends, use cooldowns if necessary.
- Phase One:
- Healers:
- Phase One:
- If you’re assigned to tank healing, always keep an eye out on who Gurtogg is currently attacking.
- Quickly swap to the new tank after a tank swap — Gurtogg does a lot of damage, don’t slack.
- Phase Two:
- All but 1 healer should be healing the Fel Rage player.
- Spam quick heals on them, don’t cheap out with mana.
- You will need to heal even harder when they get debuffed by Arcing Smash or Fel Acid Breath.
- Use cooldowns like Nature’s Swiftness if necessary to keep them alive.
- Switch back to healing your Phase 1 target when Fel Rage ends, particularly as a tank healer.
- Phase One:
- Ranged DPS:
- Melee DPS:
- Phase One:
- Move to the opposite side (left -> right) if you get targeted by Fel Acid Breath.
- Don’t be in front of Gurtogg, ever.
- Rogues: Use Cloak of Shadows to dispel Fel Acid Breath off yourself.
- Phase Two:
- Phase One:
Check out an in-depth breakdown in our Gurtogg Bloodboil Strategy Guide!
Mother Shahraz
- Tanks:
- Main Tank: Use any defensive cooldowns you have when Shahraz enrages at 10% HP.
- Offtanks: Use your mitigation gear & stand on top of the MT at all.
- Offtanks: Use your mitigation gear & stand on top of the MT at all times, so as to soak Saber Lash damage for him.
- Healers:
- Raid Healers: Make sure the raid is topped off at all times — Sinful Beam can kill people from almost full health.
- Raid Healers: Try to heal people targeted by Fatal Attraction, using any instant cast heals you have — they will die very quickly.
- Don’t hesitate to use survival cooldowns like Divine Shield or Desperate Prayer if you get targeted by Fatal Attraction.
- Keep an eye out on your mana as Wicked Beam will drain it — use mana potions if you need to.
- Ranged DPS:
- Casters: Use your personal DPS cooldowns when Shazrah casts a Prismatic Aura that’s favourable or neutral to you.
- Mages: Use Blink to move away faster after Fatal Attraction.
- Shadow Priests, Warlocks: Be careful with your Shadow Word: Death / Life Tap during this fight, only use it when it’s safe.
- Melee DPS:
- Use your personal DPS cooldowns during Heroism / Bloodlust for maximum DPS.
- Make sure you are not in front of the boss while it is being pulled, else you may die to Saber Lash.
- Rogues, Warriors: Use Sprint / Intercept to move away faster after Fatal Attraction.
Check out an in-depth breakdown in our Mother Shahraz Strategy Guide!
Illidari Council
- Tanks:
- Gathios Tank: Quickly move Gathios to his assigned spot, you don’t want Consecration hitting the raid.
- Gathios Tank: Move Gathios out of AoE, but be careful to not move towards or away from the raid, so you don’t outrange healers.
- Gathios Tank: Use Spell Reflection when Gathios uses Judgement to reflect his Judgement of Command.
- Gathios Tank: Gathios hits very hard — don’t hesitate to use cooldowns in order to survive if you’re not getting healed in time.
- Veras Tank: You can DPS Gathios when Veras uses Vanish, but you’ll need to quickly pick him up afterwards, as his threat table is reset.
- Malande Tank: Make sure Malande is not close enough to Gathios to benefit from his Chromatic Resistance Aura.
- Healers:
- Gathios Tank healers: Gathios does a lot of damage, sometimes out of nowhere — do not lose focus, pump heals on the tank.
- Veras Tank healer: Your tanks will spend long periods of time not taking damage, don’t lose focus because of that.
- Raid Healers: Don’t panic and stop healing if you have to move out of AoE — keep using your instant cast healing spells!
- Raid Healers: Make sure the raid is topped off at all times — there’s a lot of stuff that can suddenly kill players in this fight.
- Raid Healers: When Veras uses Vanish, quickly top off people targeted by Deadly Poison, or they will die to Envenom.
- Raid Healers: If Malande manages to cast Divine Wrath, top off her target asap — it does a huge amount of damage.
- Mage Tank healer: Top off your Mage every time he runs by the middle of the room while he’s kiting Zerevor.
- Don’t hesitate to use survival cooldowns like Divine Shield or Desperate Prayer in order to avoid nasty AoE & Deadly Poison.
- This fight can be pretty long, so make sure you’re using Super Mana Potions and Dark Runes to avoid running out of mana.
- Mage Tank:
- Remove your Greater Blessing of Salvation for this fight, so you can do as much threat as possible.
- Wait for a Hunter with the Hawk Eye talent to pull with a Misdirection to you.
- If your raid doesn’t have a Hunter with the Hawk Eye talent, you will need to initiate the pull by running in with a Blessing of Protection.
- Spellsteal Zerevor’s Dampen Magic right away, else you are probably going to die and your raid will wipe.
- After you have the Dampen Magic buff, use your personal cooldowns and nuke Zerevor — you want to have threat on him.
- After you have dealt 30-40k threat on him, you will want to switch to the kite strategy.
- Kite Zerevor around the room by running up the ramps in the back of the room, as shown in the diagram in the The Fight section.
- You will need to Spellsteal Zerevor’s Dampen Magic multiple times, as it only lasts 2 minutes — make sure you renew it.
- Call out on voice chat if you need healing as you’re running past the raid near the middle of the room.
- Don’t hesitate to use your Master Healthstone if Zerevor hits you multiple times while you’re in the back of the room.
- Call out on voice if Zerevor starts casting Flamestrike, to help your raid avoid it.
- Casters:
- Use your personal DPS cooldowns during Heroism / Bloodlust for maximum DPS.
- Your main DPS target will be Gathios (the paladin).
- If Gathios uses Chromatic Resistance Aura, switch your focus to Malande (the priest) until the aura fades (30 seconds).
- While attacking Malande, be careful of her Reflective Shield — use a Master Healthstone if you accidentally crit yourself for half your HP.
- If Gathios uses Blessing of Spell Warding on Malande, switch your focus back to him.
- Shadow Priests: Keep your Misery debuff up on Gathios, Veras and Malande as much as possible.
- Warlocks: Make sure Gathios & Malande have all appropriate curses at all times.
- Warlocks: If your raid doesn’t have a Rogue keeping Mind-numbing Poison III up on Malande, keep Curse of Tongues on her at all times.
- Hunters:
- It is vital that you understand how to initiate this fight with Misdirection — a mistake will wipe you.
- A Hunter with the Hawk Eye talent needs to pull by attacking Zerevor (the mage) with a Misdirection on the Mage tanking him.
- If none of you have the Hawk Eye talent, the Mage tank will need to initiate the pull by running in with a Blessing of Protection.
- DO NOT USE Arcane Shot ON ZEREVOR — YOU WILL DISPEL HIS Dampen Magic AND WIPE YOUR RAID.
- All of your remaining Hunters should now attack the other Council members with Misdirection on the respective tank.
- You will be attacking the same target as melee DPS players, not casters, so check out the Melee DPS tab.
- Malande Rogue:
- Equip PvP gloves (f.e. Merciless Gladiator’s Leather Gloves) so you can interrupt Malande’s casts with Deadly Throw.
- Rotate Deadly Throw and Kick to interrupt all of her casts.
- You only need 1 Combo Point to interrupt with Deadly Throw.
- If you don’t have PvP gloves, your interrupt priority will be: Divine Wrath > Circle of Healing > Empowered Smite.
- Keep Mind-numbing Poison III on Malande at all times to make interrupting her easier — use Shiv if necessary to apply it.
- Call out on voice chat when she gets Blessing of Protection, so your Shamans can interrupt her instead.
- Melee DPS:
- Use your personal DPS cooldowns during Heroism / Bloodlust for maximum DPS.
- Attack Veras Darkshadow (the rogue) as much as possible, he has virtually 0 armor so you do huge damage to him.
- When Veras uses Vanish, switch to Gathios (the paladin).
- Switch back to Veras when he becomes visible again, but give the tank a few seconds to establish threat first, as he resets threat.
- Quickly follow the tank as he moves Gathios out of his Consecration.
- Warriors: 1 Sunder Armor gets Veras to 0 armor, which will boost your raid’s damage significantly.
- Retribution Paladins: Make sure Judgement of Wisdom stays up on Gathios at all times, use Crusader Strike on him when necessary.
Check out an in-depth breakdown in our Illidari Council Strategy Guide!
Illidan Stormrage
- Main Tanks:
- Phase One: Main Tank
- Illidan hits hard — always be prepared to react to a damage spike with a defensive cooldown.
- Keep Shield Block / Holy Shield up at all times & make sure you have 101.8% combined block, dodge and parry to nullify Shear.
- Quickly move Illidan out of the flames created by Flame Crash so melee DPS can keep safely attacking him.
- Make sure Illidan never faces your raid — it will be very bad if hit hits them with his Draw Soul, a frontal cone.
- Protection Warriors: Keep Demoralizing Shout & Thunder Clap up on Illidan at all times.
- Phase Two: Flame of Azzinoth Tanks
- Quickly pick up your assigned Flame of Azzinoth.
- Make sure your Flame never faces the raid, or people will die to Flame Blast.
- Kite the Flame in a circle-ish pattern as shown in the Phase 2 section, slowly, to avoid filling the arena with green flames.
- The green flames do about 1250 damage / second to you, so you can use defensive cooldowns & move through them quickly if necessary.
- You can’t move your Flame more than 25 yards away from its glaive, or it will enrage and wipe your raid.
- Move out of the Eye Blast‘s path if it is coming towards you — it will kill you in 1 hit.
- The blue flames only do about 500 damage per second to you, so you can move through them or stay in them if necessary
- Do not hesitate to use your defensive cooldowns if your HP drops low or you have to move far from the raid — if you die, it’s a wipe.
- Main Tank: You cannot tank the Flames of Azzinoth, you’ll die in 1 hit — you’re essentially melee DPS for this phase, so check their section.
- Phase Three: Main Tank
- Exact same as Phase 1 for you.
- Exact same as Phase 1 for you.
- Phase Four: Main Tank
- You cannot tank Illidan in his Demon Form, you’ll die in 1 hit — you’re essentially melee DPS for this phase, so check their section.
- You can keep attacking Illidan during his 10 second transition animations, but move out the moment he enters his Demon Form.
- If he falls to the ground during his Demon Form, your raid has successfully skipped Phase 4, go back in and do threat ASAP.
- Phase Five: Main Tank
- Almost the same as Phase 3
- If Maiev drops a trap near you or to a convenient spot, move Illidan to it.
- While moving, never show Illidan your back, keep using Shield Block / Holy Shield to nullify Shear & never let Illidan face the raid.
- If you can’t get Illidan into a trap to counter his Enrage, use all of your defensive cooldowns in order to stay alive.
- Protection Warriors: You can use your Shield Wall to counter Illidan’s Enrage OR to safely move him to a trap.
- Phase One: Main Tank
- Healers:
- Phase One:
- Main Tank Healers: Illidan hits hard — don’t ever lose focus, or the tank could die in a matter of seconds.
- Raid Healers: The only thing for you to heal during this phase will be Parasitic Shadowfiend, so this phase will be pretty easy for you.
- Phase Two:
- This phase is extremely healing intensive — make sure you understand what’s going on.
- There’s a small break after every phase in this fight, so don’t hesitate to use max rank spells and use a lot of mana if necessary.
- Flame of Azzinoth Tank Healers: Your tank will take very unpredictable damage spikes, don’t ever stop healing them.
- Raid Healers: Melee will inevitably get hit by fire a lot here & need extra healing.
- Raid Healers: Spam max rank heals on the player targeted by Dark Barrage — it does a LOT of damage.
- Phase Three:
- Same as Phase 1, but make sure you are more than 5 yards away from other players.
- Raid Healers: Agonizing Flames does more damage over time — its last 3 ticks hurt, pump big heals on players targeted by it as it ends.
- If you don’t need to heal anyone, help DPS with Wrath, Smite & Lightning Bolt — it can make the difference with skipping Phase 4.
- Phase Four:
- This phase is extremely healing intensive — make sure you understand what’s going on.
- Stand far away from Illidan so the Shadow Demons have to travel a longer distance to get to you.
- Stay more than 5 yards away from other players.
- Warlock Tank Healers: Your tank will take very unpredictable damage spikes, don’t ever stop healing them.
- Raid Healers: Agonizing Flames from the previous phase is still ticking, don’t stop healing its target.
- Phase Five:
- Same as Phase 3, but make sure you move away from Maiev’s traps if the tank is taking Illidan to it.
- Main Tank Healers: Your tank will need even more healing in this phase due to Enrage & moving to Maiev’s traps.
- Once Illidan is trapped, help DPS him down with Wrath, Smite & Lightning Bolt.
- Phase One:
- Ranged DPS:
- Phase One:
- Try to save your cleave spells like Multi-Shot and Chain Lightning for Parasitic Shadowfiends.
- Hunters: If your raid doesn’t have an Arms Warrior or Rogue that can do it, keep the Aimed Shot healing reduction up on Illidan at all times.
- Phase Two:
- Hunters: Use Misdirection on the tanks.
- Watch your threat — tanks are using Fire Resistance threat and thus have lower threat output.
- Shadow Priests: If you have to move due to your lower ranged, make sure you’re stacked on top of other players on the opposite group.
- Shadow Priests, Warlocks: Be very careful of your self-damage during this phase.
- Save your major DPS cooldowns for Phase 3.
- Phase Three:
- Phase Four:
- Attack Illidan from your max range, while standing more than 5 yards away from other players.
- You are chiefly responsible for killing Shadow Demons — focus those targeting players near them, then healers, then the Warlock tank.
- Phase Five:
- Same as Phase 3, but make sure you move away from Maiev’s traps if the tank is taking Illidan to it.
- If you transitioned to this phase from Phase 4, use threat reduction abilities like Soulshatter or Feign Death, or you will likely die.
- Phase One:
- Melee DPS:
- Phase One:
- Try to save your cleave spells like Whirlwind for Parasitic Shadowfiends.
- Arms Warriors, Rogues: Keep the Mortal Strike / Wound Poison healing reduction up on Illidan at all times.
- Phase Two:
- Stack up on top of each other.
- Be careful of fire as you follow the Flames of Azzinoth & never be in front of them.
- Avoid being near any of the ranged groups, so you don’t hit them with splash damage.
- If Illidan uses Eye Blast on the side you’re currently on, switch sides.
- If there’s Eye Blast blue flames on both sides, move to the south of the grate and wait it out, don’t risk it.
- Save your major DPS cooldowns for Phase 3.
- Phase Three:
- Phase Four:
- Move to the back of the room and stay more than 5 yards away from other players, you cannot DPS Illidan during this phase.
- Only go in to kill Shadow Demons if absolutely necessary, for example if they’re approaching a target near you.
- Phase Five:
- Same as Phase 3.
- Same as Phase 3.
- Phase One:
Check out an in-depth breakdown in our Illidan Stormrage Strategy Guide!
About the Author


