- Author: Furious
- Date: December 3, 2018
- Updated: October 10, 2020
- Expansion: WoW Classic
This guide will help you upgrade your dungeon 1 set to your dungeon 2 set in World of Warcraft Classic.
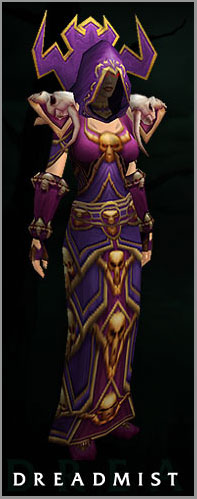
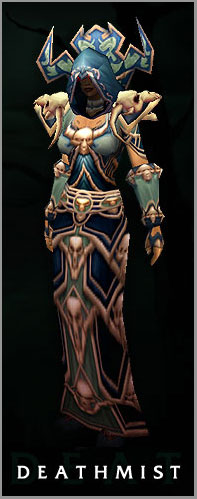
Dreadmist to Deathmist in 300 easy steps!
Overview
For those not in a guild, not in a raiding guild or possibly still learning your way into the high end instances, the Dreadmist to Deathmist armor upgrades are something to consider. Even if you do have some armor pieces from raiding, you may be able to garner one or two upgrades while you wait for the bigger drops. The downside to the armor upgrade quests though, is you have to do them in order, so if you are only looking at one of the later pieces, it’s probably not worth the time or gold investment unless you know a second upgrade is a long way off.
One thing to keep in mind, is although these were implemented to assist the “casual” gamer, it will cost you a decent amount of money. There is the gold contribution involved in some of the quests, as well as purchasing any tradeskill you can not obtain yourself. On top of that is the time investment and further instance runs. Don’t go into this thinking they will be simple upgrades, some of them are of epic quality and they are going to make you work for it.
That said, here is all the information you need to upgrade!
Getting Started
Alliance
For Alliance, the initiating quest giver is Deliana, found inside the throne room in Ironforge. The throne room is the area that backs onto the bank, accessed from heading through The Great Forge.
Horde
For Horde, you need to see Mokvar, you will find him inside Thralls Chamber in Orgrimmar. By now you should know where Thrall is, but for those that don’t, open your map (M) when in Orgrimmar and head around to the rear of The Valley of Wisdom.
Tradeskill Items
(Tradeskill – another name for Profession that works better in guides…)
On top of the items you have to run around collecting, these quests also require quite a few different tradeskill items. Depending on what professions you chose, you may be able to make some yourself. If not, then this is the time to call in any friendly favors, speak to your local guild trades or risk the Auction House .
Materials
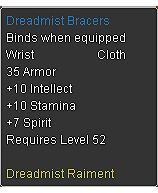
Quest 1 – Bracers
- No tradeskill items are required.
- You will require 20g though…
Quest 2 – Belt & Gloves
- 1 x Delicate Arcanite Converter
- 4 x Greater Eternal Essence
- 10 x Stonescale Oil
You will also require 90g
- 40g for Mux Manascrambler
- 50g to buy a Quest Item: Fel Elemental Rod
- (or 40g if you purchase it while not on the quest)
- Extra Goblin Rocket Fuel as required.
Delicate Arcanite Converter
The Delicate Arcanite Converter is created by an Engineer. If you are an engineer yourself, you simply need to get hold of 1 x Arcanite Bar (created by an Alchemist) and 1 x Ironweb Spider Silk. The Arcanite Bar is created with 1 x Thorium Bar and 1 x Arcane Crystal.
If you do not have one or both of these skills, you will most likely have to spend some gold in order to obtain them. To try and save as much money as possible, compare the price of purchasing the completed objects, with that of purchasing the components.
For example it might be cheaper to purchase 1 x Thorium Bar and 1 x Arcane Crystal and find an Alchemist to do the Transmute, than it might be to purchase the Arcanite Bar outright. It also might be cheaper to purchase the Arcanite Bar that way, obtain the Spider Silk yourself and then request an Engineer to combine it all into the Arcanite Converter for you.
The Ironweb Spider Silk is easily obtained from spiders from level 40 onwards. I personally went to Azshara and killed the Timberweb Recluse’s. Dropped from my 3rd spider. You can see the full list of spiders found to drop it here.
Greater Eternal Essence
If you have chosen Enchanting as your profession of choice, then you most likely would have come across a couple of these. If not, you can either check the Auction House, ask friends, or check if your guild might have any spare. The other option is to purchase cheap items on the AH and try to disenchant them to obtain your 4… the problem with that however, is there are no real guaranteed items to produce them, so you may end up spending more money.
Stonescale Oil
Created by Alchemists, it also requires a little fishing. Stonescale Oil comes from Stonescale Eels, and these are fished. If you have your fishing level raised, you can attempt to fish these yourself and then request an alchemist to convert them into oil for you. It’s been said that Stonescale Eels can only be fished from open waters, meaning a coast line and not from ponds, lakes or rivers.
Recommended locations are Steamwheedle Port in Tanaris, Bay of Storms which in Azshara, and the eastern coast of The Hinterlands.
Tip: Fish in the early hours of the morning (server time, not yours) and you have a higher chance of catching them.
Quest 3 – Shoulders, Boots, & Pant
- 3 x Dark Iron Bars
- 3 x Mooncloth
- 20 x Enchanted Leather
- 4 x Cured Rugged Hide
- 8 x Large Brilliant Shard
- 4 x Dark Runes
Dark Iron Bars
The Dark Iron Bar is created by miners who learn the Smelt Dark Iron ability, and it requires 8 Dark Iron Ore to create one Dark Iron Bar. Dark Iron deposits can be found in Blackrock Depths, Molten Core, Searing Gorge, and the Burning Steppes. Dark iron ore also drops from the elite golems in BRD.
For those that chose Engineering as a profession, you may very well have Mining to accompany it and as such can go out and farm the Ore yourself. If you do not have Mining as an ability you will once again have to check the Auction House, Friends or Guild mates. Like before, check to see the price of Ore Vs Bar to see if you can get it done cheaper. Remember to multiply the price of Ore by eight to give you a comparison for 1 Bar.
Mooncloth
Mooncloth is a Tailor created item which combines two pieces of Felcloth while standing in a Moonwell. It requires a minimum skill of 250 as well as inflicting a four day cooldown… meaning for three pieces it would take 12 days. If you have Tailoring and can make these, start putting a couple in your bank prior to reaching this step. Otherwise again, you will have to utilize the AH or any contacts you have.
Enchanted Leather
Something that a lot of people may not have even heard of until these quests came about, Enchanted Leather is actually created by an Enchanter funnily enough. 1 x piece of Rugged Leather, which is obtained via skinning mobs in the high 40’s range and up, is then combined with 1 x Lesser Eternal Essence. As with all the other pieces, compare raw material prices to the finished product to save money.
Cured Rugged Hide
Leatherworking is not really a skill a lot of Warlocks have, which is what this item requires. The Rugged Hide comes from skinning, however it isn’t as common as the normal Leather which doesn’t help the price much. The tricky part to this item though is the Refined Deeprock Salt that must be combined with the Hide in order to Cure it.
Refined Deeprock Salt requires Deeprock Salt which drops off many level 40 – 60 creatures in many different zones. The best drop rates are from Golems in the Badlands and Searing Gorge. Once obtained, it is then processed into the refined version using a Salt Shaker. The Shaker is created by an Engineer with 250 skill or higher, and requires 1x Mithril Casing, 6x Thorium Bar, 1x Gold Power Core, 4x Unstable Trigger.
Tip: For this item, it would be best to just try to purchase it via the AH, or through a contact.
Large Brilliant Shards
Large Brilliant Shards can usually be disenchanted from weapons and armor of superior (blue) quality as well as normal items level 55 and above.
Dark Runes
These items drop inside Scholomance, most commonly off of Doctor Theolen Krastinov, Instructor Malicia, Lady Illucia Barov, Lorekeeper Polkelt, Scholomance Dark Summoner, Scholomance Necromancer and The Ravenian. All classes require these for this step in the quest line, so it may take you a few runs to obtain all four.
Quest 4 – Helm & Chest
- 120g to purchase a Hallowed Brazier
- 4 x Twilight Trappings
- 1 Twilight Cultist Medallion of Station
(i.e. 1 Large Brilliant Shard and 3 x Abyssal Crests) - 1 Signet of Beckoning: Fire (optional)
- 1 Flask of Supreme Power
Twilight Trappings
- 1 x Twilight Cultist Mantle
- 1 x Twilight Cultist Cowl
- 1 x Twilight Cultist Robe
Drops from any of the Twilight mobs in Silithus. Twilight Avenger, Geolord, Avenger, etc. Being BoE (bind on equip) you could check your local Auction House to see if there are sets for sale.
Twilight Cultist Medallion of Station
This item is the result of the Dukes of the Council quest which starts with Aurel Goldleaf in Cenarion Hold in Silithus. You need to bring back 1 x Large Brilliant Shard and 3 x Abyssal Crests. You also need to be a minimum of ‘Friendly’ to Cenarion Circle in order to pick up this quest.
To obtain an Abyssal Crest, you need to acquire a complete twilight cultist set, go to a lesser windstone, put on the set and activate the stone (remember to put your armor back on, since the set will disappear). You will need to do this three times. Once you have the 3 crests, return to Aurel with those and your Large Brilliant Shard to acquire the Medallion.
Flask of Supreme Power
Created by Alchemists, this isn’t just your average creation. Like with the other tradeskill items, you can compare the prices for the finished item to the mats, but bear in mind not all Alchemists will have this recipe.
Mats : 30x Dreamfoil, 10x Mountain Silversage, 1x Black Lotus, 1x Crystal Vial
Note: If you do the quests at lvl 60, a lot of the gold you spend will be returned as quest rewards instead of XP.
Now, after all of that… let’s get on with the actual quests!
Quest 1 : Bracers!
 |
 |
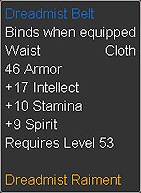
Total Loss : -7 Spirit Alliance Quest – An Earnest Proposition
Quest Objective: Acquire 15 Winterspring Blood Samples and 20 gold and bring them along with a set of Dreadmist Bracers to Deliana in Ironforge.Winterspring Blood Sample’s are dropped in Winterspring funnily enough; the frostsabers at Frostsaber Rock seem to have the best drop rate.Horde Quest – An Earnest Proposition
Quest Objective: Acquire 15 Silithus Venom Samples and 20 gold and bring them along with a set of Dreadmist Bracers to Mokvar in Orgrimmar.
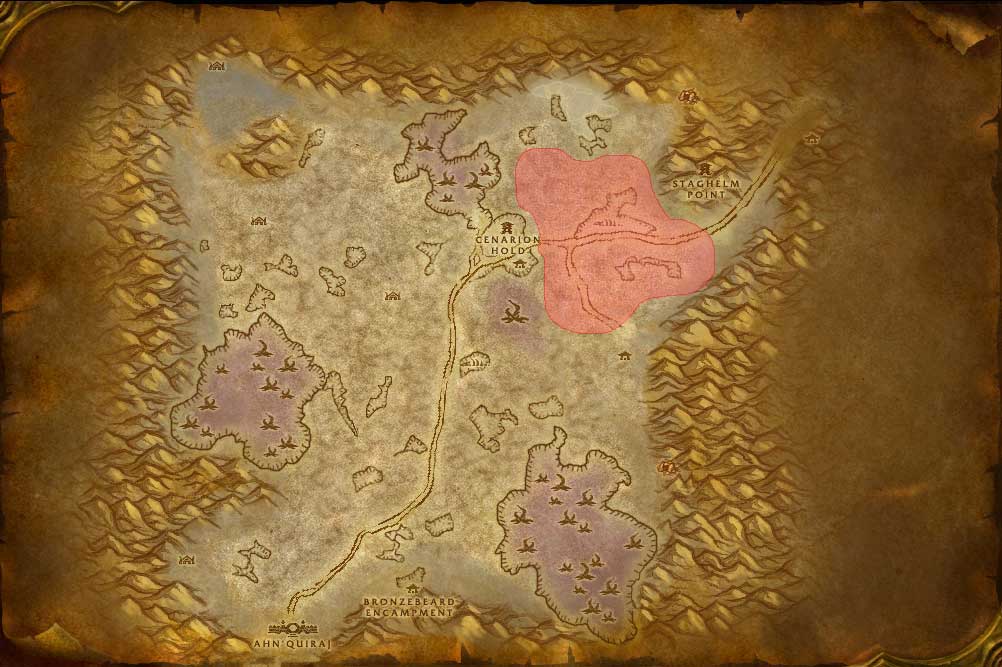 For Horde, you will need to head to Silithus for the Venom Samples, easily obtained off the spiders and scorpions in the zone. For quick killing I hunted the area between Cenarion Hold and the Un’Goro Crater pass. [See Map to the right]Once you have collected either the blood or venom, head back to your respective quest givers and hand them in along with your Dreadmist Bracers and 20g. Voila! Quest 1 completed…Note: Upon handing in the quest you will be attacked by three to four Spectral Stalkers (black shadowy figures). These are non-elite and easy to kill and the guards even jump in.
Quest 2 : Belt and Gloves!
 |
 |
|
 |
 |
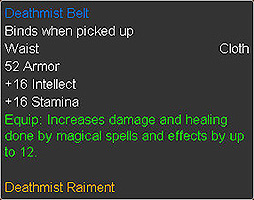
Total Loss : -23 Spirit.
Quest Objective: Bring the Sealed Blood Container to Mux Manascrambler inside Gadgetzan in Tanaris.It seems Mux Manascrambler holds no favourites when it comes to Alliance or Horde as both sides receive the same quests from here on out…Mux Manascrambler can be found inside the hut with the engineering trainer, directly left of the Inn if you are facing it.
Quest Objective: Return to Mux Manascrambler in Gadgetzan with 1 Delicate Arcanite Converter, 4 Greater Eternal Essence, 10 Stonescale Oil, 25 Volcanic Ash and 40 gold.Here is where you will need to organize the Delicate Arcanite Converter, Greater Eternal Essence and Stonescale Oil if you haven’t already. Scroll up for more information.
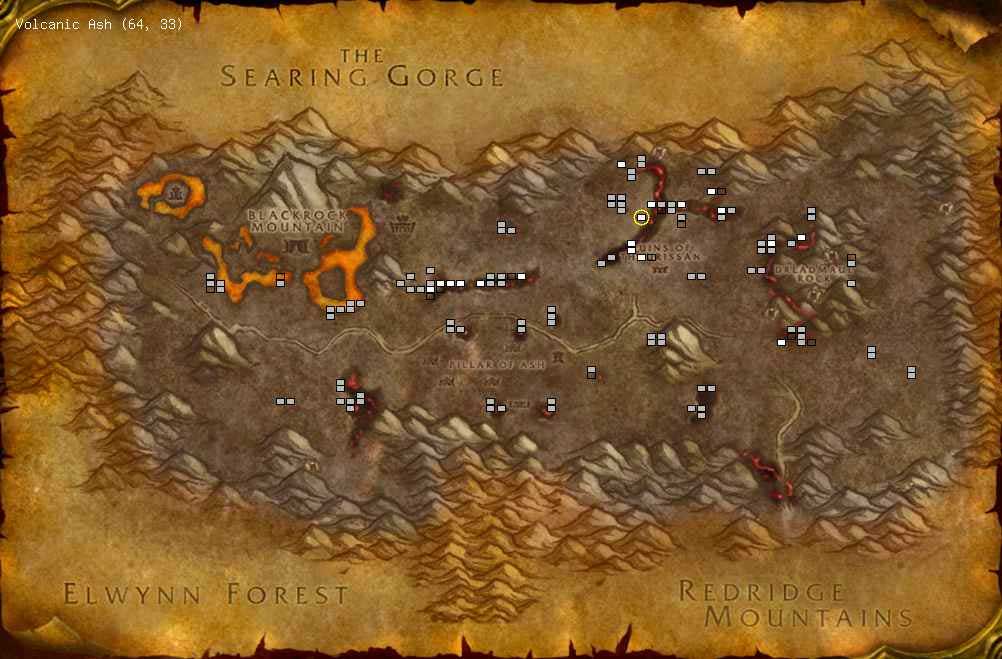 The Volcanic Ash you need to collect yourself and you will find it in piles near lava streams in Burning Steppes. I spent about 10 minutes running up and down the lava stream in front of Flame Crest, the location of the Horde flight path collecting all mine. If you see the map to the right, you can see you can get them from all over the zone.
Hunting for Ectoplasm
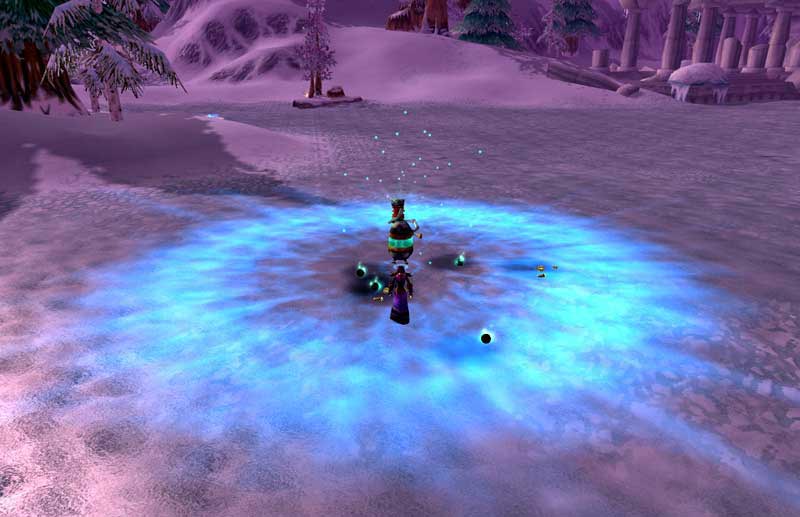
Quest Objective: Use the Ectoplasmic Distiller near incorporeal undead to collect 12 Scorched Ectoplasms in Silithus, 12 Frozen Ectoplasms in Winterspring and 12 Stable Ectoplasms in the Eastern Plaguelands. Bring them along with the Ectoplasmic Distiller back to Mux Manascrambler in Gadgetzan.
The Ectoplasmic Distiller is very easy to use. Right click it from your inventory and it will drop one charge onto the ground for you. It will pulse a blue light which helps show the range you need to be in when you kill the mobs.
Note: The distiller casts a 2 second buff on players. YOU must have this buff active when the mob dies in order for an ectoplasm to drop. Killing the mob while IT is inside the Aura, and YOU are outside of the aura will not work. However YOU can be inside the auro while the MOB is outside, and it will drop. For safety, have everyone inside the pulsing arua.
Each charge uses 1 x Goblin Rocket Fuel and you are supplied with 8 from Mux. Each charge lasts for approximately 3 – 4 minutes (didn’t time it sorry). If you do run out of fuel, the Mats are 1x Firebloom, 1x Volatile Rum and 1x Leaded Vial and it is created by an Alchemis. Firebloom requires Herbalism and is easily found in Tanaris. The Volatile Rum is dropped from the Bloodsails in Stranglethorn and the Southsea Pirates in Tanaris.
As you can see from below, it has a relatively large range.
As far as actually gathering the ectoplasms, there is no right or wrong order you can do them in. I personally went to Eastern Plaguelands, Winterspring, and then onto Silithius. The locations for each:
Eastern Plaguelands : 71 – 30
The best place for Stable Ectoplasm in Eastern Plaguelands is Northdale, as there are nothing but ghosts there (but watch out for fear). Both the Banshees as well as the invisible ghosts will drop Ectoplasm. Cast Detect Greater Invisibility on yourself and any helpers before heading here to avoid unwanted multi-pulls. Another option is to get the Ectoplasm from the Banshees at Corin’s Crossing. You will have wait for respawns here though.
Winterspring : 53 – 42
Head to Lake Kel’Theril, just South-West of Everlook. Any of the mobs on the lake will drop it, but there are some ruins on the northwest part of the lake with very high concentrations of them. Southwest of the lake there are some more ruins with many ghosts.
Silithus : 62 – 53
The tortured night elves in Silithus are located in Southwind Village, along the middle of the eastern mountains. When you kill them, they spawn 0-3 bugs, which really limits how quickly you can kill them. These mobs can be hard to solo as the Destiller will despawn if you try run away from the bugs. Group up with a class capable of healing or another damage dealer to increase you chances here. For an added bonus, pick up The Spirits of Southwind quest in Valor’s Rest before you start and earn some Cenarion Circle reputation.
Note:
While in Winterspring, head up to Dakwhisper Gorge and purchase the Fel Elemental Rod now. You obtain it from the imp Vi’el (map), who resides in a cave near the entrance to Darkwhisper Gorge. Travel south along the road from Everlook, and cross the bridge. You can sneak past the two elite Hederine Slayers at the entrance to the gorge, and also past the elite Felhound at the mouth of the cave if you pay careful attention to its patrol route. This will make the cost 40g. If you wait until you are on the quest that requires it, it will cost you 50g. Plus this saves you a trip back.
Additional tips
- To maximize your fuel, wait to drop the Distiller until just before your first enemy dies.
- The distiller will vanish if you get too far away from it (it’s forgiving, about 50-60 yards).
- Multiple players of the same faction can share a single Distiller by pulling mobs to it, but only one Ectoplasm can be looted per mob. However, grouping up with one or two players will help, because this will allow you to kill the mobs faster than alone in addition to sharing the distiller, which saves fuel.
- It is possible to do this with the provided fuel, if you can either kill the mobs fast enough or group with other people.
- The Distiller’s buff seems to keep you in battle until you are outside of it’s range, so you may have to take a few steps after kills to eat and drink.
- A good way of doing it is to have two mages gather the mobs to a centralized point where you have dropped the distiller and AoE.
Once you have collected all the ectoplasms, head back to Mux Manascrambler and hand in.
 A Portable Power Source
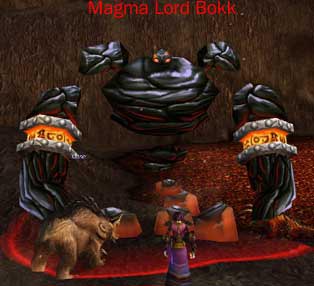
Quest Objective: Find Magma Lord Bokk in the Burning Steppes, obtain his Magma Core and bring it to Mux Manascrambler in Gadgetzan.
After handing in the ectoplasms, you are sent back to Burning Steppes to kill Magma Lord Bokk. A non-elite earth elemental, you will find Bokk around the northern tip of the lava pool (it shows up on the map) that’s just west of the Pillar of Ash. Location around 35,58.When pulled he usually comes with 1 add, but being a relatively easy kill himself, the add shouldn’t cause too much hassle. Bokk does have three procs however, and you may see one or all three during the fight. They are ~600pt Earth Shock, ~100pt Knock Away, and a brief Ground Tremor stun.
Note: Don’t rush into pulling Bokk as there is a 60 elite Dragon that wanders by. Check before pulling that you won’t agro that as an add…Once you have obtained Bokk’s Magma Core, return to Mux in Tanaris and hand in.
A Shifty Merchant (Elite)
Quest Objective: Search for an imp inside a cave at the entrance of Darkwhisper Gorge in southern Winterspring, purchase a Fel Elemental Rod and return to Mux Manascrambler in Gadgetzan.
This is the step in the quest series that you can save yourself a trip on if you purchased the Fel Elemental Rod while collecting your ectoplasms in Winterspring. See the note above (in red) on how to get to the Imp. If you already have the rod on you, simply hand in straight away.
Return to Deliana / Return to Mokvar
Quest Objective: Bring the Extra-Dimensional Ghost Revealer to Deliana in Ironforge if you’re Alliance, Mokvar in Orgrimmar if you’re Horde.
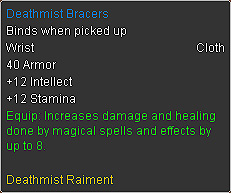
After having into Mux, you are sent back to your Deliana in Ironforge or Mokvar in Orgrimmar where you will hand in your Dreadmist Belt and Gloves in exchange for upgraded Deathmist version. The gloves are of epic quality, grats!
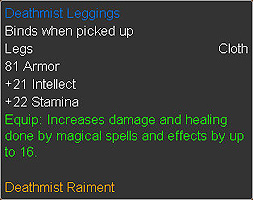
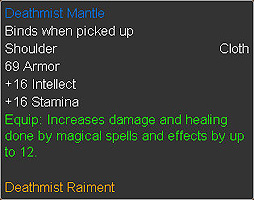
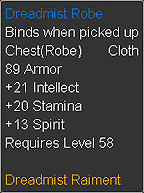
Quest 3 : Pants, Shoulders, Boots!
 |
 |
|
 |
 |
|
 |
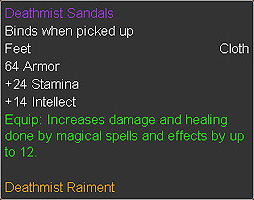 |
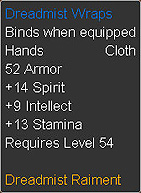
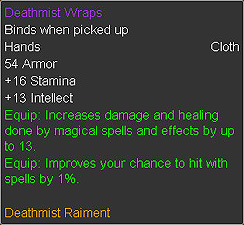
Total Gain : +16 Armor, +13 Intellect, +16 Stamina, +40 Spell Damage
In Search of Anthion
Quest Objective: Use the Extra-Dimensional Ghost Revealer at the entrance to Stratholme and speak with the ghost of Anthion Harmon.
For those that have run Stratholme (Strat) a few times would know, there is both a “live entrance” and an “undead entrance”. You will find Anthion in front of the meeting stone at the main (live) entrance – 55,17. Click on your Extra-Dimensional Ghost Revealer to see and interact with him. He will give you the quest Dead Man’s Plea. After you accept the quest, travel to the second (undead) entrance of the dungeon.
Dead Man’s Plea (aka the “45 min Baron Run”)
Quest Objective: Go into Stratholme and rescue Ysida Harmon from Baron Rivendare.
The goal behind this step in the quest series is to rescue Ysida Harmon from the evil clutches of Baron Rivendare, the end boss that can sometimes drop his mount. AE fun for Warlocks abound with all those skelles!
 With Patch 1.10 changing the instance from being able to run in a 10 man raid, down to a 5 man group, and then adding in a 45 minute timer, a lot of people struggled with this step in the series. Since then though, a lot of guides have popped up to help out the ones still yet to complete it. The guides are long and there are many versions, so I’m not going to post a copy of them all here. I will however provide links for those wanting more information.
There is also a map created that I’m sure will be of some use to a lot of people. You can find a copy of that below. If you still require more information before heading in, be sure to google for it as there is countless amounts out there.
Most groups have a pretty good idea now of what they are going into, but if you are the one creating the group, and perhaps going in with some first timers, here are a few tips to help.
Group Make Up
Normally you can attempt instances with all sorts of group make ups, however as this is a timed version, you want to try to perfect your group as much as possible. This is only a guide into what you are looking for, alterations can depend on the gear and skill of each player.
1. Warlock. You… naturally.
2. Priest. One of the first classes you want to look for, they become a necessity for healing, especially as you won’t be following the normal routine and anyone doing damage could/will need healing. Rezzing and Shackling are also two major points for having a priest with you.
If you can not locate a Priest, you could attempt with a Druid/Shaman/Paladin that knows their healing.
3. Tank. Ideally a Warrior, you could settle for a Druid/Paladin. Ideally the mobs won’t be staying alive long enough to require too much tanking, so this spot is somewhat flexible on which class fills it.
4. DPS! Most will recommend a Mage to fill the fourth spot for sheeping casters, counterspelling, and AOEing skeletons, clearing out Ziggurats. Look for a Mage first for those reasons plus Water / AI buff.
5. DPS! More DPS won’t ever hurt with this run. You want quick kills, so the more DPS you can bring the better. Another Warlock, Mage, Hunter or Rogue…
Remember that is just a rough idea, as time passes, and more people obtain better gear the list will become more flexible. This guide was written pre-Tier 3 armor and naturally will become dated over time.
 45 Min Run F.A.Q.
Q: When does the “45 min” countdown start?
A: Once you open the second gate, that is the gate after the first big room in Strath, the Baron will tell you to “…withdraw from my domain before she (Ysida) is executed!” After the Baron says this, everyone gets a 45 minutes debuff called The Baron’s Ultimatum.
Q: Do I have to kill the Baron in 45 minutes?!
A: No, you just have to engage the Baron in 45 minutes or less, you can take half an hour killing him once you enter combat if you like. When you engage the Baron, the 45 minute timer/debuff goes away. If you wipe during the fight with the Baron, he kills Ysida immediately. If you wipe at any other point in the instance, the timer just continues as normal (though you may not be able to see it at all times).
After you have killed the Baron, you should find Ysida there waiting to be rescued. Speak to her and she will give you her locket and the next stage of the quest…
Additional tips
- Note: The rumour about using Spectral Essence to talk to the prisoner at the end is not true.
- Warning: There have been claims that using Medallion of Faith to summon Aurius for the final battle can break the quest, thus making it impossible to complete.
- Note: The rumour about the quest breaking when someone who doesn’t have the quest is the first to attack baron is also fake.
Proof of Life
Quest Objective: Bring Ysida’s Locket to Anthion Harmon in Eastern Plaguelands.
Very simple really. Once you have completed the 45 Minute Baron slaying successfully, obtain the locket from Ysida and return to the ghost of Anthion Harmon.
Anthion’s Strange Request
Quest Objective: Bring 3 Dark Iron Bars, 20 Enchanted Leather, 3 Mooncloth and 4 Cured Rugged Hides to Anthion Harmon in the Eastern Plaguelands.
All of these items are obtained via a tradeskill. At the top of the guide is information on how to obtain each of these items. Once you have them, return to Anthion and hand in.
Anthion’s Old Friend
Quest Objective: Take the incomplete Banner of Provocation to Falrin Treeshaper at the library in Dire Maul.
Tip: 1x Lesser or regular Invisibility potion will help, as will 1 x Swiftness potion and/or a Nifty Stop Watch (trinket).
Dire Maul lies in the heart of Feralas. You need to navigate to the library which connects the North and West wings. Between Feralas and the library however are two locked doors. For this you need the Crescent key.
The key is dropped by Pusillin, a rather annoying imp in DM east, whom you cannot fight until you’ve chased him through most of the zone. You can bypass the first door requiring the key by using the ghost trick (die on one side, run through the door in ghost form and rez on the other side), but you would still need the key to reach the library inside. So you need the key, someone with the key, a rogue or perhaps try a seaforium charge if you are an engineer.
Once you have one of the above options to entering, make your way to Feralas. Depending on if your Alliance or Horde, you will go either east or west to almost the middle of the zone. If you follow the main path, just above The High Wilderness you will see a smaller path heading north… that will lead you into DM. (Location 59,53).
When you follow the path north you will start to pass some elite ogre’s, you can either stop to kill if you want, or just run past. You can avoid most, and the ones you do agro will drop off. As you enter DM, you will see a ramp…go up the ramp and follow it around to your right. You should then see it leads to your left where you will come to a T-intersection. Take it to your left, and them immediately after, right. That will then force you right again where you will pass through a thin tunnel before entering a large courtyard.
You now need to make it to the opposite end of the courtyard, and the door waiting there is the first one requiring the key. You can either run straight down the middle of the courtyard, or around the sides. Either way you are most likely going to agro mobs, so be sure to have the key ready! Just on the other side of the door is the instance entrance, so any mobs you have agro’d won’t bother you any more.
Once inside you face another courtyard. If you go left out of the entry, you will see a ramp leading down. What you need to do is jump on the ledge of that ramp, and you can practice that safely with the eye. (jump downwards diagonally). Once you’ve gotten onto the ledge, you will see another ramp leading down to a door on the lower level. This is the door to the library.
Make sure to soulstone yourself just in case disaster strikes, and wait for the right moment to move. There is a point where there is nothing between you and the ramp, letting you move without using the invisibility potion. Once you’re on the ledge, look down to assure there are no dog packs in your way, these see through invis! Once ready, run down the second ramp to the library door. You’re in!
Now just follow the long path until you enter the Library and look for Falrin Treeshaper.
Falrin’s Vendetta
Quest Objective: Collect 25 Ogre Warbeads from Ogres inside Dire Maul or Blackrock Spire and return to Falrin Treeshaper inside the Athenaeum in Dire Maul.
Just as the quest says, you can get these beads from the Ogre’s both inside and outside Dire Maul, as well as the ones in Blackrock Spire. I tried the Ogre’s outside DM, stocking up on lots of Mage water and solo’ing, but the drop rate was atrocious. I ended up putting together an LBRS group and managed to get most of my beads in one run.
Note:
Although the drop rate is much higher in Lower Blackrock Spire, there is also much fewer ogres in that instance. It will require multiple runs of either instance to obtain all of the Ogre Warbeads required.
It’s also said that North Dire Maul has a very good drop rate, most commenting on having them done before reaching half way into the instance. When you hand in the Ogre Warbeads, you also get to choose between two necklaces, one of them being very nice for Warlocks:
The Instigator’s Enchantment
Quest Objective: Bring the following to Falrin Treeshaper inside Dire Maul: 1 Jeering Spectre’s Essence, 4 Dark Runes and 8 Large Brilliant Shards.This is one of the very few times you will load Detect Greater Invisibility! Jeering Spectre’s Essence drops from the ghosts in DM West (Eldreth Apparitions, Phantasm’s, etc). It’s been debated upon where you can pick these items up regardless of if you have the quest or not, although apparently you do need to be in a group. Because I wasn’t following a guide when I did the quest, I already had it when I got my essence to drop, but you could try killing a few ghosts before heading to hand in the beads.As listed at the start of the guide, the Dark Runes drop from inside Scholomance, and the Large Brilliant Shards come via disenchanting. The drop rate for the essence seems fairly average; I got mine of the 5th kill.When you return to Falrin Treeshaper to hand in the items, he gives you a Banner of Provocation to take to Blackrock Depths. Immediately after receiving the banner, you will be attacked by 5 to 6 ghosts which will spawn close by. It does not seem to matter if you win the battle or not.
Quest Objective: Travel to the Ring of the Law in Blackrock Depths and place the Banner of Provocation in its center as you are sentenced by High Justice Grimstone. Slay Theldren and his gladiators and return to Anthion Harmon in the Eastern Plaguelands with the first piece of Lord Valthalak’s amulet.If you’re up to this stage of the quest series, there’s a very good chance that you have already been to BRD enough to know the Ring of Law, it’s the mesh circle at the center of the arena. When a player stands on the mesh circle the entrance to the ring is closed, and High Justice Grimstone appears in the ring. This dark iron dwarf is flagged red, but cannot be attacked; his purpose is to explain what is about to happen.For the Alternate Ring of Law battle, the one you want to do, place the banner in the center while the dwarf is “sentencing” you, and destroy all the mobs that come out of the gates. These mobs behave like a pvp group with a mage, healer, warrior, rogue, and sometimes a dynamite tossing goblin. They can’t be taunted and will make a beeline for the healers. Every enemy who fights with Theldren is immune to a warrior’s taunt, so crowd control is a must.The completion of the event spawns a box of loot and you get to keep the banner in case you want to get the loot again in the future. Do not forget to loot the Top Piece of Lord Valthalak’s Amulet from Theldren.Loot of note (from chest, which only appears if Theldren is killed)
- Ironweave Mantle
- Level 56 required
- 155 AC
- +17 Stamina
- +11 Intellect
- 1/8 Ironweave Battlesuit set.
Once you have looted the Amulet from Theldren, head back to Anthion Harmon in the Eastern Plaguelands to hand in.
Anthion’s Parting Words
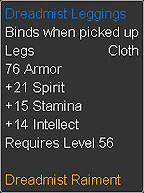
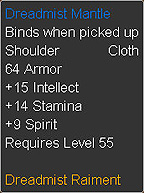
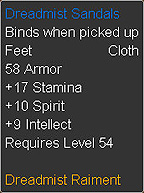
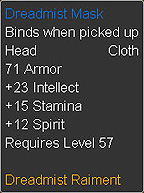
Quest Objective: Return to Mokvar in Orgimmar / Deliana in Ironforge with a set of Dreadmist Sandals, Dreadmist Leggings and Dreadmist Mantle.
Congratulations on your new items!
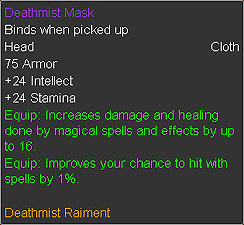
Quest 4 : Helm and Chest!
 |
 |
|
 |
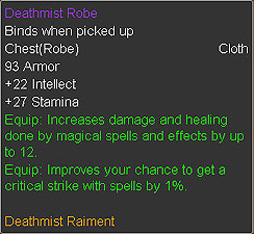 |
Total Loss : -22 Spirit.
Quest Objective: Travel to Blackrock Mountain and use the Extra-Dimensional Ghost Revealer to find Bodley near Blackrock Spire.
You will find Bodley right outside the entrance to Blackrock Spire
Three Kings of Flame (Raid)
Quest Objective: Gather the Incendicite of Incendius, the Ember of Emberseer and the Cinder of Cynders, along with a Hallowed Brazier, and return them to Bodley inside Blackrock Mountain. Incendicite of Incendius
Drops from Lord Incendius in Blackrock Depths (BRD).Lord Incendius is the fire elemental that guards the Black Anvil located in BRD. You can solo him if you want to give it a go, but a lot will depend on gear and to a certain degree talent spec. He is fairly deep inside the instance however, so for ease sake I would recommend jumping into a group already heading in there, or creating your own. Ember of Emberseer
Drops from Pyroguard Emberseer in UBRS.Pyroguard Emberseer is most likely going to be the first boss you kill in UBRS which can be done with a 10 man raid. After opening the door to Upper Blackrock Spire, you enter an octagonal room with 6 smaller branch-offs filled with elites, and one exit. Dispatch all the rooms and proceed up the steps. Ahead there are two more rooms with elite blackrocks in them, easily dispatched. On the far side of the room is a staircase going up, take it. Make sure everyone in your raid is inside the room before proceeding, once the event starts the door closes.Have 3 of your raid right click the Blackrock Altar in the middle of the room, and twelve non-elite orc casters will run at you. If you have a decent group with you, feel free to AE these down (particularly if you can combine it with a mage AE). 1 minute after the event has started Pyroguard Emberseer will be summoned. Kill and loot. Cinder of Cynders
Drops from The Duke of Cynders in SilithusThis will be harder of the three to collect as there are four dukes that can be summoned, and the summoning is random… meaning you are not always guaranteed to summon the duke first, second or tenth time. There are two ways of summoning the Duke:
- Aquire a set of Twilight Trappings and a Twilight Cultist Medallion of Station. This will make you appear to be a middle-ranked leader of the Twilight’s Hammer. Travel to a Wind stone and use it to summon a Duke. You have a 1 in 4 chance of summoning the Duke of Cynders.
- Turn in Encrypted Twilight Texts to Hermit Ortell. He will then mail you a random item. If you get a Scroll: Create Signet of Beckoning (Fire), you can combine that with a Dark Rune and 5 Firebloom to create a Signet of Beckoning: Fire. This signet can be used to specifically summon the Duke of Cynders.See the start of the guide for how to obtain the Twilight Trappings and Cultist Medallion. Once you have chosen your desired method of getting the duke to spawn, go about gathering a group and activating the wind stones.
Hallowed Brazier
Sold by Quartermaster Miranda Breechlock in Eastern Plaguelands, Argent Quartermaster Lightspark in Western Plaguelands or Argent Quartermaster Hasana in Tirisfal Glades.
Requires honored with Argent Dawn and will cost you 120 gold.
Note: All three items are group drops and are lootable by all characters who have the quest.
Once you have all the pieces, head back to Bodley.
More Components of Importance (Elite)
Quest Objective: Return one of four items to Bodley inside Blackrock Mountain.
Now things get a little trickier, especially if you are working with someone to complete these quests. At this stage you can get one of four random quests:
Soul Ashes of the Banished
If you are given this quest, you need to head to Purgation Isle, located off the coast in Hillsbrad Foothills. If you can remember back to when you had to find the book for the Felhunter Quest, the island is not far. Head down to the coast and along the beaches heading west. Once you reach almost to the end, there is a large island just out a bit. [See this map]
Once there you need to kill Condemned Monks, Cursed Paladins or Writhing Mages until the ashes drop.
Brilliant Sword of Zealotry
If you given this quest, you need to make your way to Tyr’s Hand located in Eastern Plaguelands. If you have not been here before, it is the area south east of Corin’s Crossing. Easily solo able, depending on the time of day you many have more troubles finding mobs that killing them. [map] You need to be killing the praetorians.
Druidical Remains
For the remains, you need to go to Hive’Regal in Silithus and kill Hive’Regal Burrowers, Hive’Regal Spitfires or Hive’Regal Slavemakers. [map]
Starbreeze Village Relic
And lastly, if you require the relic, go to Frostwhisper Gorge in Winterspring and kill Frostmaul Giants or Frostmaul Preservers. They’re the big Ice Giants just before Darkwhisper Gorge. [map]
The drop rate on each quest seems to be about equal, anywhere from 5-20 kills. Easily doable by 2 people, possible to do solo. There does appear to be a pattern with relation to the first quest determining the second you get. This might help in seeking out groups for the second stages if you pass someone doing the step you are on.
The Left Piece of Lord Valthalak’s Amulet
Quest Objective: Use the Brazier of Beckoning to summon forth a spirit slay it. Return to Bodley inside Blackrock Mountain with the Left Piece of Lord Valthalak’s Amulet and the Brazier of Beckoning.
As mentioned above, depending on the first quest you received, you will be given one of the following:
1. Kormok in Scholomance
You will find the Brazier of Beckoning to summon the spirit of Kormok in Ras Frostwhisper’s chamber. Fight your way to Ras Frostwhisper’s room, kill him and clear all the mob’s in the room, buff up and then use the Brazier of Beckoning to summon Kormok the Ogre necromancer. He is 60 elite but is harder than he looks.
During the fight he will summon countless undead skeletal guardians which will need to be taken care of. The key here is proper Crowd Control. Just killing them will only spawn more adds and waste everybody’s mana, so it helps to have your pet off tank one (or both) or possibly have a mage Frostnova them in place and focus DPS on Kormok to get him down ASAP. Kormok himself seems to have some AoE Shadowbolt that does moderate (shadow protection buff!!) damage along with some fairly powerful single-target attacks.
Another possibility is, just ignore all spawning adds and focus MAX DPS on Kormok. For this strategy it is of course useful to bring 2 other well equipped damage dealers. Healing is only done by priests healing nova or Shadowpriests Vampiric Embrace and pots so MT never looses aggro of spawning adds (demoralizing shout!). Shield wall also turned out to be extremely helpful.
Kormok also has some sort of bone shield which reflects damage; it is magic and should be debuffed (mage) or eaten (Felhunter) ASAP.
After you kill Kormok, you will receive the left/right part of the Amulet.
2. Jarien and Sothos in Scarlet (live) Stratholme
The spirits of Jarien and Sothos can be summoned in Grand Crusader Dathrohan’s (Balnazzar’s) chamber. These are 2 Undead you will have to fight, Sothos and Jarien. The first one has a shield and is the bad guy, he will fear, charge around (apparently random) and do a very painful AoE Shadowbolt. The second one is melee only, not hard to tank, her only special ability is a 1k damage cleave.
A good strategy is killing Sothos first, as he is the one that will hurt you with AoE Shadowbolt. After he is dead, which is not hard with some good DPS, his spirit will help the fight against the remaining mob, that should be a off tank on, a Paladin or Shaman can do a job good.
Shadow Protection Buff or potion will help a lot, as will do a good mana potion for the healer. If DPS is not strong enough they will cause a good amount of damage to the party. Don’t forget to have fear ward on tank, first thing Josho will do in combat is fear everyone around.
3. Mor Grayhoof in Lower Blackrock Spire
Mor Grayhoof is a ghostly Druid boss whose Brazier of Beckoning can be found inside War Master Voone’s chamber. The fight is straightforward. After killing Voone in LBRS, drop the brazier to summon. He shape shifts into various forms (bear, sprite, etc). When he uses his hurricane spell, back up out of the AoE.
He also periodically heals, which should be interrupted – it helps to have the Felhunter out for this fight to interrupt (spell lock!) these heals. He has an extremely large mana pool, and repeatedly healing may make it harder/impossible to kill if you can’t do enough damage or stop it.
Mor Grayhoof should be turned facing the far wall so the hurricane doesn’t affect the party. He also has an AoE moonfire he will cast on those in front of him.
4. Isalien in Dire Maul East
Lastly we have Isalien who can be summoned in Alzzin the Wildshaper’s chamber inside Dire Maul East. Isalien is a hunter/druid spirit who will also summon a fairly strong pet (a hippogryph) about 10 seconds into the fight. When she does, everyone but the MT should concentrate on it until dead.
Her primary damage is spell damage. She can be disarmed, and should be when possible. But the key to defeating this encounter is to interrupt her heal spells. She heals for about 50% of her hp with just one heal and has more mana then a group of just hunters, warlocks and priests can ever drain, so it’s absolutely critical to shield bash, pummel, kick, or counter spell all heal attempts. Once you kill the pet and learn to time the heal interrupts, she goes down easily.
Alternative Tactics
Draining Mana does work, but prepare for a long battle if you do, she has about 32k of mana. However, she doesn’t hit very hard, so if you take out the add first, you can afford to sit there with a good tank and healer and just wait until her mana is gone. We did her with a Warrior, Resto Druid, Mage and two Warlocks and the two Warlocks drain was enough. Once her mana is gone, she is simple enough to defeat.
– submitted by anonymousIt is possible to drain her mana simply by forcing her to heal herself. We went there in group of: – Rogue 60 – Priest 60 – Mage 60 – Druid 60 – Warlock 51 We started a fight and we killed her pet right after she spawned him then we went on her. Rogue kept aggro by dealing damage and the mages did too. Fight lasted around 20 mins. Priest used couple of major mana potions and used innervate. Rogue used couple of major healing potions. Anyway it wasn’t hard, just long.
– submitted by anonymous
While you can summon these bosses in a raid group, your piece of the amulet will only drop in a regular party. Once you have your required piece, head back to Bodley.
Note:
Even though it is possible to loot your piece of the amulet by killing any of these summon bosses when helping others out, the quest will now also require you to actually slay the boss itself too. So, it is not possible to complete this quest simply by helping with someone else’s summon.
I See Alcaz Island In Your Future… (Elite)
Quest Objective: Gather 20 Bloodkelp from the Strashaz naga and then return to Bodley inside Blackrock Mountain.
The Bloodkelp you need drops from the 59-60 Elite Nagas on Alcaz Island in Dustwallow Marsh. It can also be looted from “Bloodkelp Baskets”, usually found inside or near the various buildings on the island. Depending on your soloing ability with elites, you could attempt this solo or bring a friend. Drop rate is fairly good and can come in quantities of 1 – 3 each time.
The Right Piece of Lord Valthalak’s Amulet
Quest Objective: Use the Brazier of Beckoning to summon forth a spirit slay it. Return to Bodley inside BlackrockMountain with the Right Piece of Lord Valthalak’s Amulet and the Brazier of Beckoning.
If the description of the quest is giving you a case of deja vu, don’t panic… it’s the same steps as the left piece of the amulet. That’s right, you now have to follow the steps again, although this time you are likely to get a different target. (Given the info is just above, I’m not going to repeat =p )
Note: Upon returning to Bodley, make sure you bring Lord Valthalak’s Amulet (not just the right piece). You can do this by clicking any one of the pieces once all three are in your inventory to create the amulet.
Final Preparations (Raid)
Quest Objective: Gather 40 Blackrock Bracers and acquire a Flask of Supreme Power. Return them to Bodley inside Blackrock Mountain.
The Flask of Supreme Power is one of the tradeskill items outlined at the start of the guide, but the Blackrock Bracers you need to collect. Both the Orcs in Uppper BRS and Lower BRS will drop the bracers; however the ones in UBRS have a better drop rate. You could also team up with a friend to kill the ones at the entrance, flipping the instance when needed if you can’t get a group. Once gathered, return to Bodley.
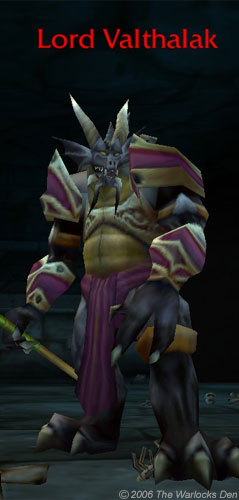 Mea Culpa, Lord Valthalak (Raid)
Quest Objective: Use the Brazier of Beckoning to summon Lord Valthalak. Dispatch him, and use Lord Valthalak’s Amulet on the corpse. Then, return Lord Valthalak’s Amulet to the Spirit of Lord Valthalak.
You need to summon Lord Valthalak in “The Beast’s” Room in Upper Blackrock Spire. Valthalak has three phases that you need to be aware of.
Phase 1:
Valthalak has a caster type weak melee attack in phase 1. A slow, 400-500 damage to a warrior.
Shadow Wrath
A shadow-based, chain-lightning, life drain. Hits for 750 Shadow damage on the first target, and will jump to another target if anyone is close enough. Each time it jumps, it doubles in damage in the manner of Holy Wrath from High Priest Venoxis from Zul’Gurub. At the 4th jump, the damage will be 6k and lethal for most people. Being a life-drain, all damage dealt will heal Valthalak.
To counter: Burn his mana down. A Viper Sting from a Hunter is sufficient although as well as your mana drain would be helpful. Until his mana is down, keep everyone spread out and do not allow more than two people go near him. The Main Tank should fight Valthalak far away from the ranged DPS. You can also Kick Valthalak to interrupt the Shadow Wrath attack.
These spawn two at a time throughout phase 1. They cast a Mind-flay like Defile ability (a purple vile beam) that cannot be dispelled and stuns its target. After 10 seconds, its target will automatically die regardless of health, and themselves turn into an additional stalker. The only way to end the effect is to kill the assassin, or stun/fear it. To counter: Everyone must kill Spectral Assassins as soon as they appear. They can be hard to see and target, so hit ‘v’ to bring up the Mob Health panes and click on them, or use this macro: /target Spec. They are squishy targets, little or no armor or resistances, and only around 1,500 health. They can also be damaged by Area of Effect spells. If everyone helps out they will usually drop in just a couple seconds. Be very aware of any that spawn inside Valthalak and stun the MT.Phase 2: EnrageAt 40% health, he will briefly stun all players, switch weapon and start hitting the Main Tank very hard. He stops spawning Spectral Assassins but still does Shadow Wrath if he has mana. To counter: Have a well-geared main tank. Keep Viper Sting up and use your mana drain if you see it rising too quickly. Focus your DPS on him, and he will drop quickly. Generally easier than Phase 1.Phase 3: Shadowbolt VolleyAt 15% health, he will begin to cast Shadowbolts on the entire raid in addition to the changes in phase 2. To counter: Everyone should have some shadow resist buffs or potions by the time this phase occurs. Healers should burn mana consumables to keep everyone alive as long as possible. DPS should blow all their cooldowns to maximize damage on Valthalak, so he won’t last long.Once you have managed to kill Valthalak, use the amulet on his corpse which will summon his spirit. Speak to the spirit to get the quest that sends you back to Bodley. Return to Bodley
Quest Objective: Return to Bodley inside Blackrock Mountain and give him the Brazier of Beckoning.You get this quest after talking to the spirit of Lord Valthalak! A few people have left after killing him thinking that was enough, it’s not, you must talk to the spirit as he gives you the quest to return to Bodley. Back to the Beginning
Quest Objective: Speak with Deliana at The High Seat in Ironforge / Mokvar at Grommash Hold in Orgrimmar’s Valley of Wisdom.
Originally Posted by BodleyI suppose that this is goodbye then, my friend. But, I’ll always be here if you want to come back and talk with me from time to time. Probably while you’re loitering around waiting for your buddies to join you for a raid on Blackrock Spire.
Go, before I start to cry.
Total Armor changes
+38 Armor
+20 Intellect (or +200 base mana)
+36 Stamina (or +360 base hitpoints)
+ 97 Spell Damage!
+1% chance to hit with spells
+1% chance to crit with spells
– 92 Spirit (which, as Warlocks isn’t really a problem)
 |
 |
F.A.Q.
Q. What level do I need to be to start the quests?
A. A minimum of level 58 is required to start the first (bracer) quest.
Q. Can I pick and choose what items I want?
A. Unfortunately the quests must be done in order, so if you want one of the last items, you are required to do all the previous steps.
Q. Do I have to hand in all three pieces for the 3rd quest? I just want the boots!
A. Sadly yes, all three pieces are handing in at once. This also means you cannot have four pieces of Dreadmist, and 4 of Deathmist
Credits
The Deadmist > Deathmist Tier 0.5 Ugrade guide was written and compiled by Akasha and Crypt for The Warlocks Den. Sadly The Warlocks Den is no longer online so the guide has been preserved here.
We would like to thank the following people for their contribution.
- ceptimus for providing the Alliance quest giver information.
- Angelina for the in-depth steps to make the items required for Quest 2.
- Calista for all the information posted about the first couple of steps
- Derugash for the directions to the DM Library.
- Zargon, Solstice, Bombardem, Raistln and Kubrick for information posted.
- Everyone else who helped answer questions and confirm information about the quests.
- And overlordbob for creating the banner to give the guide that finishing touch!
About the Author