- Author: Kyrasis
- Date: February 19, 2022
- Updated: April 19, 2024
- Expansion: World of Warcraft


General Gearing
Given that you’ve read about the tank performance measures, we are looking to build our character with an optimal combination of mitigation, EHP, and damage for the content we are doing. This section is going to briefly review the contribution of various attributes, explain how they contribute to each performance measure relative to each other, and give general recommendations for gearing in item slots without unique effects.
Recommendations
Itemization Rules of Thumb:
- Disregarding limited ilvl differences, target Tier Set Bonuses
- Disregarding limited ilvl differences, target Embellished Items
- Disregarding limited ilvl differences, target items with Sockets
- Disregarding limited ilvl differences, target items that do NOT have Critical Strike
- Disregarding limited ilvl differences, target items that have Versatility
- Consider Haste and Mastery as relatively equal in value
- Avoid excessive secondary stat Diminishing Returns
(Full explanations associated with each rule of thumb are provided at the end of the section)
Embellished Items:
Unconditional (1): [Allied Chestplate of Generosity]
With 6+ Sockets: [Elemental Lariat]
Unconditional (2): [Shadowflame-Tempered Armor Patch]
Optional Bonus Effect: [Alchemical Flavor Pocket]
Generalized Stats Breakdown:
Overall: Versatility > Mastery = Haste > Critical Strike
Tier Set Bonuses
Patch 10.2 includes decent tier set bonuses that are obtainable from multiple sources. These tier set bonuses generally make tier pieces worth using over gear sets that do not make use of tier set bonuses.
2-piece bonus:
[Heart Strike] and [Blood Boil] deal 20% increased damage and have a 10% chance to grant [Vampiric Blood] for 5 seconds. Any granted [Vampiric Blood] duration is added to any existing [Vampiric Blood] duration you may have.
This tier set bonus can generally justify a combined item level drop of up to ~17 item levels assuming the other items in question do not have a tier set bonus of their own.
4-piece bonus:
Anytime you would otherwise gain [Vampiric Blood] duration, you now also gain 5 seconds of [Vampiric Strength], a 10% strength buff. All applications of [Vampiric Strength] stack additively with existing duration, except when you manually cast [Vampiric Blood] where, for whatever reason, your [Vampiric Strength] will always be set to 5 seconds. Furthermore, the duration of [Vampiric Strength] will be extended by 0.5 seconds whenever you cast [Heart Strike] or [Blood Boil]. This extension effect does not interact, at all, with [Dancing Rune Weapon]. Granted, the tier set does not currently provide [Vampiric Strength] off of [Vampiric Blood] procs when you have a pre-existing [Vampiric Blood] buff, but not a pre-existing [Vampiric Strength] buff.
Gaining a [Vampiric Strength] buff also gives you an [Umbilicus Eternus] buff (when talented) of duration equal to the corresponding gain in [Vampiric Blood] duration. All initial [Umbilicus Eternus] buffs stack additively with pre-existing buffs. New shield buffs from [Umbilicus Eternus] completely overwrite any pre-existing shield buffs, should you have them, though the net effect of this interaction is positive and makes [Umbilicus Eternus] more valuable than normal.
This tier set bonus can generally justify a combined item level drop of up to ~17 item levels assuming the other items in question do not have a tier set bonus of their own.
Implications:
The main implication of this tier set is that it directly enhances the power of t [Heart Strike] and [Blood Boil], though not to the extent of changing ability priorities even if their use is extending the [Vampiric Strength] buff. In the process, a significant amount of uncontrollable [Vampiric Blood] uptime is provided, and, while useful regardless, most of these procs can’t be accounted for in your defensive rotation. The secondary implication is that [Umbilicus Eternus] is now stronger than it was previously, though this was already a talent we would take in a lot of situations.
Embellished Items
New to Dragonflight, there are a number of crafted items that are “embellished”. These embellished items provide unique and strong bonus effects, while their main restriction is that only two of these items can be equipped at any one time (with one exception). Note, these effects aren’t overly powerful in the grand scheme of things, but they are strong enough to be worth using.
Relevant Embellished Items:
[Allied Chestplate of Generousity] – This chestpiece has an appealing mastery/versatility statline and, additionally, it periodically provides you and your group versatility from a proc effect assuming (again) allies are within 30 yards of you. Granted, since this item is in a tier slot, it would lock you into which four slots you need to use for the tier set bonuses.
[Elemental Lariat] – This neck has customizable secondary stats, so there is nothing stopping us from crafting it with an ideal vers/mastery statline. Furthermore, the embellished effect provides a secondary stat proc based on the element of the gems we are using. If you have followed the guide recommendations in the use of vers/mastery gems, then that means the embellished effect will be providing a mastery proc, which is a desirable secondary stat. Granted, the strength of this embellishment effect is based on our total number of gems.
[Shadowflame-Tempered Armor Patch] – An optional reagent-based single target damage embellishment effect. This is the strongest direct damage effect embellishment at the moment and it also allows for custom statlines on any armor slots, which gives it appeal even in M+. However, recent tuning changes have not been kind to direct damage embellishments, making them a lot less appealing.
[Alchemical Flavor Pocket] – This optional embellished effect ingredient can be added to any item and, more importantly, this embellished effect does not count against your two embellished item limit. The effect makes your food last twice as long and to persist through death, so, if you happen to be using a non-embellished crafted item, anyway, you may as well add this to it even if it isn’t technically a power gain in many situations.
General Recommendation:
Unconditional (1): [Allied Chestplate of Generosity]
With 6+ Sockets: [Elemental Lariat]
Unconditional (2): [Shadowflame-Tempered Armor Patch]
Optional Bonus Effect: [Alchemical Flavor Pocket]
[Allied Chestplate of Generosity] is one of the better secondary stat embellishments for us at the moment (as long as you value the bonuses being given to allies as you would yourself). Even if crafting ilvl is 3 ilvl less than max makes a crafted chest less desirable, chest is the ideal off-tier slot in Season 4 regardless of embellishment choice, the ilvl scaling on this embellishment effect is very generous, this piece has our most-desired statline, and the same quality of statline is not obtainable on any max item lvl chest piece this season.
With enough sockets, [Elemental Lariat] provides a strong enough effect to also see play. Lower ilvl jewelry slots are not as costly as most other slots, even if you have an alternative neck with an ideal statline. You need at least 6 sockets to justify this placement.
[Shadowflame-Tempered Armor Patch] maintains solid performance. It simply provides enough single damage that it is able to outcompete *most* other embellishment options available, even in content that usually has an AoE focus. Having the ability to apply it to any armor slot means we can craft this on cloak (and wrist if you are using two) to minimize the loss of stat budget, while custom statlines are always a good feature.
Meanwhile, [Alchemical Flavor Pocket] is a nice bonus effect when you are using a third crafted item in any slot. Crafted items may not be able to go to max item level, but getting a better statline on a jewelry slot can easily overcome a 6 item level loss even if we didn’t care about the effect. Not losing food buff on death can potentially be a real positive benefit if you would otherwise not have it or need to spend time reapplying it during a key.
These embellished items, as well as a number of the others, will generally be stronger than ideally stated non-embellished alternatives even if the embellished items are 7 ilvls lower than this alternative. Though this obviously isn’t true for the bonus effect [Alchemical Flavor Pocket], since that effect is almost entirely quality of life.
All other options have relatively weaker effects for general M+ applications that hurt their competitiveness with the above options, either through weaker effects or worse statlines.
Attribute Overview
Primary Stats:
These stats are almost always present on items by default and, for any item slot where they are found, they are generally provided in proportion to the item’s level. These stats can also be provided by unique effects.
Strength – This stat directly determines how much AP (attack power) we have and it’s one of the two main contributors to parry rating. With [Blood Shield] active, strength also contributes to armor.
In general, our attack power is equal to strength. Unique effects that provide AP, directly, are extremely rare. AP contributes to our ability damage using the following general formula:
(AttackPower + 6 * WeaponDPS) * AbilityAPConstant * Vers% * MasteryAP%
Armor and parry contribution are explained under their respective sections.
Stamina – This stat directly determines how much base health we have with the following formula:
Health = Stamina * 20
In some cases, our health is used to determine the damage and healing of some abilities.
Armor – This stat reduces the amount of incoming physical damage taken according to the following formula:
Physical Damage Reduction % = Armor / (Armor + K)
The “K Value” changes depending on what type of content you are engaged in and it is generally adjusted so that players maintain similar levels of physical damage reduction over the course of an expansion. The result is that physical vs. magic damage taken in M+ should be consistent across the whole expansion. The current “K value” for M+ is ‘24308.556’.
Weapon DPS – As discussed under strength, weapon DPS is an input to all ability damage calculations.
Secondary Stats:
Two of the four secondary stats are present on most item slots by default, with a few exceptions. The ratio of the two present secondary stats is different from item to item, but the combined total is generally based on the items level. Secondary stats are also provided by several miscellaneous effects.
Critical Strike – Every 180 critical strike rating provides an additional 1% critical strike chance and every 200 critical strike rating provides and additional 1% raw parry chance. The base critical strike chance is 5% and critical strikes double the damage and healing of abilities that can crit. Specifically for BDKs, healing from [Bloodworms], [Mark of Blood], [Bonestorm], and [Death Strike] cannot crit.
Haste – Every 170 haste rating provides 1% haste, which affects rune regeneration rate, auto attack speed, global cooldown recovery rate, [Blood Boil] cooldown recovery rate, and some proc effects. While most DoT effects are affected by haste, [Blood Plague] and [Death and Decay] are not. Since a fixed amount of runes are used on [Bone Shield] management, 1% more haste gives more than 1% RP generation, since all extra runes can be used on [Heart Strike].
Mastery – Through [Mastery: Blood Shield], every 90 mastery rating increases the effectiveness of [Blood Shield] by 1% and every 180 mastery rating provides 1% increased AP. The base effectiveness of [Blood Shield] is 16% and the base value for increased AP is 8%.
Versatility – Every 205 versatility rating increases all damage and healing done by 1% and every 410 versatility rating reduces all damage taken by 1%.
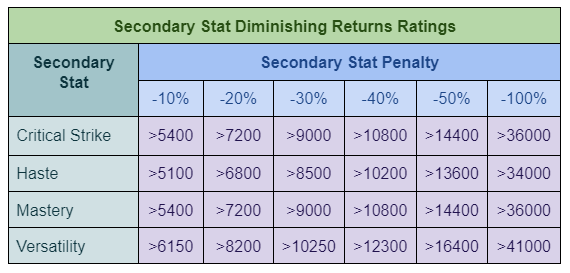
Diminishing Returns: All secondary stats have multiple rating thresholds that reduce the effectiveness of additional rating for that specific secondary stat. This reduction begins to take effect once any rating provides an additional 30% of any stat (with the exception of mastery, since different specializations use different percentage-to-rating conversions) and generally ramps up for every additional 10% unadjusted contribution after that. This diminishing returns only affects *rating* specifically, no matter where it comes from, but it does not affect stat multipliers or effects that add a fixed amount of % to the stat. Rating thresholds are as follows for each secondary stat:
Tertiary Stats:
Tertiary stats have a small chance of appearing on most items when they drop (a 7.5% chance to get one of the following three stats). Other than being a rare bonus stat, they can also be provided by a few miscellaneous effects.
Leech – Every 110 leech rating heals the player for 1% of all damage and healing done. This is only applied once to abilities that naturally have leech, it does not affect raw self-healing, and it does not affect [Death Strike], [Blood Shield], [Mark of Blood], or [Bonestorm] healing.
Avoidance – Every 72 avoidance rating reduces the AoE damage a player takes by 1%.
Speed – Every 50 speed rating increases movement speed by 1%.
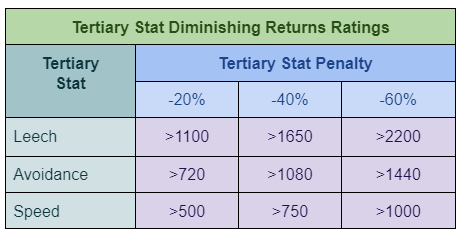
Diminishing Returns: All tertiary stats have multiple rating thresholds that reduce the effectiveness of additional rating for that specific tertiary stat, just like secondary stats. This reduction begins to take effect once any rating provides an additional 10% of any stat and ramps up at 15% and 20% unadjusted contribution after that. Rating thresholds are as follows for each secondary stat:
Miscellaneous Stats:
These miscellaneous stats can only be acquired through specific sources.
Parry – Parry is an attack avoidance stat. As is the case for all strength tanks, it is generally provided by strength and critical strike, though some other sources exist. Parry probability is determined by the following formulas:
RawStrParry=(Strength-Base Strength)/P
RawStrParry=(Strength-Base Strength)/75500
RawCritParry=CriticalStrike/D
RawCritParry=CriticalStrike/24000
FinalParry=Base Strength/P+0.03+(RawStrParry+RawCritParry)/((RawStrParry+RawCritParry)*v+h)
FinalParry=2551/75500+0.03+(RawStrParry+RawCritParry)/((RawStrParry+RawCritParry)*(1)+1/0.94)
The values for ‘P’, ‘D’, ‘v’, and ‘h’ are spec-specific and are used in multiple game mechanic formulae.
(Final parry % is reduced by 1.5% for each level the target is above the player.)
Dodge – Similar to Parry, Dodge is an attack avoidance stat. Dodge is rarely obtainable by BDK, since strength tanks do not gain Dodge contributions from primary stats or critical strike, so the dodge calculations for BDK are simplified as a result. However, every once in a while we get access to an effect that provides dodge rating.
RawDodge = DodgeRating/D
RawDodge = DodgeRating/24000
FinalDodge = 0.03+ RawDodge/(RawDodge*v+h)
FinalDodge = 0.03+ RawDodge/(RawDodge*(1)+1/0.94)
(Final dodge % is reduced by 1.5% for each level the target is above the player)
Miss – Miss is the final attack avoidance stat and it generally cannot be interacted with.
Miss=0.03+DodgeRating/24000/(DodgeRating/24000+1/0.94)
Attack Avoidance – The combination of all stats that prevent an avoidable attack from hitting. Total attack avoidance is determined as follows:
AttackAvoidance = FinalParry + FinalDodge + Miss
Mitigation
Your current character setup and what kind of encounter you are in will determine the exact value of different attributes. That being said, you’ll generally find the following secondary stat priorities to be true in Mythic+ dungeon content when ONLY considering mitigation:
Mitigation Only: Mastery > Haste = Versatility >> Critical Strike
(Note: Talent and item choices can influence the relative value of secondary stats for mitigation)
Similar to dps, it’s possible for lower item level pieces to be better for mitigation than higher item level pieces. In fact, this is generally more likely to occur with mitigation compared to damage, since primary stats are relatively poor sources of mitigation value and secondary stats have historically had wider gaps in mitigation contribution compared to something like personal damage contributions.
More Details?
Mitigation for BDKs comes in a few layers: avoiding attacks entirely (dodge and parry), proactively mitigating incoming damage as it hits you (armor, versatility, avoidance, and other damage reduction effects), and reactively mitigating damage that you have already taken (self-healing). Any damage that we can’t mitigate through these methods will need to be healed by another player or it will eventually culminate in our death.
As has been the case since Legion for BDK, the influence of versatility, mastery, and haste on mitigation is expected to grow compared to primary stats and critical strike as we progress through the expansion for the following reasons:
- Increasing the “K Value” lowers the value of armor with every major content patch, which has also, indirectly, lowers the mitigation value of strength.
- Parry from Critical Strike shares diminishing returns with Parry from Strength, except Strength values grow more aggressively than secondary stats as gear ilvl increases.
- Stamina does not directly influence mitigation outside of a few minor sources of healing, which are not overly large and don’t scale with incoming damage.
- [Death Strike] effective mitigation is a significant source of BDK healing and it heals proportional to damage taken (like armor and parry mitigation). However, its effectiveness is multiplied by three separate secondary stats (mastery, versatility, and haste), which results in increasing returns for all three of these secondary stats where most traditional forms of mitigation have some form of diminishing returns on their effectiveness.
For example, here are graphs using Shadowlands statistics comparing armor scaling to the scaling of a single [Death Strike] (adjusted to account for haste allowing for more [Death Strike] casts) in a five target encounter with increasing levels of secondary stats. On one hand, the physical damage reduction curve for armor has a decreasing slope; it is sloped in a way that each point of armor increases EHP by the same flat amount as the last point of armor. On the other hand, the [Death Strike] healing curve from the combined effects of versatility, mastery, and haste has an increasing slope for a characteristic that, like armor, ultimately negates all incoming damage by a certain %.


This is the primary reason why non-critical strike secondary stats are so influential on BDK mitigation relative to other stats and is the main reason lower ilvl gear can sometimes be better than higher ilvl gear. And, again, this effect only gets amplified as an expansion progresses.
With more targets, a few things change that affect mitigation. First, our natural rate of bone shield consumption will be elevated from the higher number of targets attacking us, which means we will need to spend more runes on [Marrowrend] to maintain our [Bone Shield]. However, with [Insatiable Blade], this cost is offset with increased cast frequency of [Dancing Rune Weapon]. Second, you gain increased effectiveness on [Heartbreaker], [Hemostasis], and [Umbilicus Eternus] if you are taking any of those talents. All potential positive bonuses compound with existing healing effects and make sources of increased [Death Strike] mitigation more effective, either directly or indirectly, with the exception of [Umbilicus Eternus].
As for leech, leech doesn’t affect [Death Strike] or [Blood Shield] healing, so it is not a significant source of mitigation. It does have *some* value, but it’s very very rare that it will change any specific gearing decision.
As for avoidance, most of the damage we take in Mythic+ dungeons is not AoE, so avoidance does not provide a significant amount of mitigation.
What if we are taking high amounts of magic damage?
Critical strike’s mitigation is directly proportional to the amount of avoidable attack damage being taken by the player, so it gets less valuable with more magic damage intake. Mastery provides full mitigation as long as a high enough % of incoming damage is physical (enough to fully utilize your [Blood Shield]); once you drop below this threshold additional Master effectively provides no defensive value. If all damage being taken is magical, both critical strike and mastery provide an insignificant amount of mitigation.
Effective Health
EHP Only: Versatility >> Haste
EHP is mostly affected by attributes that are tied to item level (strength, stamina, armor), with the big exception of versatility (and, in some cases, avoidance).
- The amount of versatility an item has can have a large impact on how much EHP it gives, often allowing items with versatility to provide the same amount of or more EHP than items 7 ilvls higher without versatility.
- Assuming two items both have Versatility, ilvl will generally determine which item provides the most EHP.
- Most of the damage the tank currently takes in M+ dungeons is not AoE, so avoidance is not significantly useful for increasing EHP.
- Beyond Versatility, Haste is the only secondary stat that provides EHP (indirectly) through [Red Thirst].
Extra Considerations:
EHP in this guide is generally referring to reliable EHP, which is either always available when you are taking damage from an attack or when it is 100% controllable like a defensive cooldown. However, there are a few other sources of EHP that also have some value depending on the situation. For instance, proc-based EHP bonuses can still have significant value in M+ where trash pulls are often dangerous for their entire duration even if they aren’t controllable. Even extremely unreliable sources of EHP, such as sources based on attack avoidance (dodge and parry) and the ability for [Blood Shield] to raise our total HP % above 100% are providing at least some EHP value, since it lowers the chance that you will be lowered from a high amount of health to dead in a short amount of time. Furthermore, since our main form of mitigation is [Death Strike], which is on the global cooldown, higher amounts of haste can potentially allow us to [Death Strike] faster in response to damage (which gives enemy targets less time to kill us before we can react).
Also, since we are generally pooling RP for reserve [Death Strike]s, it’s worth noting that mastery and versatility are the only attributes increasing the effectiveness of each point of pooled RP, which is effectively our “reserve” health pool.
Damage
Optimizing gear for damage nowadays is fairly easy, and, other than understanding the trade-offs involved, optimizing damage for tanks is not really any different than optimizing damage for dps specializations. In general, secondary stat priorities for damage, like everything, are going to change based on your character setup and circumstances. A general priority for ONLY damage can easily be generated with sims, but it may look something like this:
ST Damage Only: Critical Strike >= Haste >= Versatility >= Mastery
AoE Damage Only: Critical Strike >= Versatility >= Mastery >= Haste
Unlike mitigation, secondary stats are relatively close in value when it comes to increasing damage, so the hierarchy of stat weights can very easily change depending on your current stats (and items). Furthermore, primary stats account for a larger portion of an item’s damage contribution. Because of this, it is generally more likely for higher ilvl items to result in more damage as opposed to other measures.
While all secondary stats are generally multipliers on the amount of damage being done, there are a few sources of damage that are not affected by haste. Opting into more of these sources of damage, such as [Abomination Limb], [Soul Reaper], [Blooddrinker], [Bonestorm] or [Shattering Bone], will devalue haste’s relative damage contribution. It is especially notable that most baseline uncapped AoE damage is not affected by haste, hurting its AoE damage contribution. A few damage sources are also not affected by mastery, such as unique damage effects on items.
Overall
So, let us now consider all secondary stat effects at the same time:
Mitigation Only: Mastery > Versatility = Haste >> Critical Strike
EHP Only: Versatility >> Haste
ST Damage Only: Critical Strike >= Haste >= Versatility >= Mastery
AoE Damage Only: Critical Strike >= Versatility >= Mastery >= Haste
Again, the general recommendation for M+ dungeons is to try and maximize mitigation as long as especially inefficient EHP/damage tradeoffs aren’t being made in the process. As such, the overall secondary stat priority ends up looking like this:
Overall: Versatility > Mastery = Haste > Critical Strike
Itemization Guidelines
The following rules of thumb were developed when looking at generalized items with a 50/50 split on their secondary stat allocations; they are meant to provide general itemization rules that will be true a majority of the time, though it is not impossible to come up with specific circumstances that can justify larger or smaller item level differences than what is listed here particularly when comparing items that do not have 50/50 splits in their secondary stat allocation.
1. Disregarding limited ilvl differences, target Tier Set Bonuses
The bonuses provided by the tier set are strong enough to justify using lower item level gear within some limits. The two-piece bonus can justify a combined item level drop of up to ~17 item levels, while the four-piece bonus can justify a combined item level drop of up to an additional ~17 item levels over non-tier replacements.
2. Disregarding limited ilvl differences, target Embellished Items
The bonus effects provided by embellished items are strong enough to justify using lower item level gear within some limits. For the recommended embellished items and a number of the alternatives, an item level drop of at least 7 item levels can be justified (with the exception of the [Alchemical Flavor Pocket]).
3. Disregarding limited ilvl differences on jewelry (specifically), target items with Sockets
A socket is generally worth more than 7 item levels on jewelry and 3 item levels on armor slots.
4. Disregarding limited ilvl differences, target items that DO NOT have Critical Strike
Critical strike in place of other secondary stats is a significant source of mitigation loss to the point where lower item level items without critical strike are often better in M+ settings, everything else held equal. For jewelry, unless unique effects or a large counterbalancing force is involved, avoiding critical strike is worth more than any practical ilvl gap you would encounter outside of a very fresh character. Avoiding critical strike is generally worth more than a 7 item level difference when substituted with haste or mastery on armor, while 10 item level differences can be justified when substituted with versatility on armor.
5. Disregarding limited ilvl differences, target items that have Versatility
Versatility provides a strong combination of overall bonuses to the point where lower item level items with versatility can be better in M+ settings, everything else held equal. That being said, the gap between versatility and the second-best secondary stat is somewhat smaller than the gap between critical strike and the second-worst secondary stat. For jewelry, unless unique effects or a large counterbalancing force is involved, taking items with versatility is worth more than any practical ilvl gap you would encounter outside of a very fresh character. Preferring versatility is generally worth more than 3 item levels on armor when taken in place of haste or mastery.
6. Consider Mastery and Haste as relatively equal in value
At this current time, both mastery and haste have very similar relative value. Changing between these stats does not justify disregarding other differences in item quality and even sizable-enough deviations in ratings before diminishing returns or could cause this preference easily to flip between the stats. As such, their value should be considered relatively equal and, if possible, the player should try not to create an overly large gap between these two secondary stats.
7. Avoid excessive secondary stat Diminishing Returns
As previously mentioned, your secondary stats start getting penalized if you have too much rating in any one of them. The first diminishing returns range is not too difficult to reach, while the second range is very difficult to reach outside of temporary buff effects. Generalized secondary stat preferences mostly hold throughout the first diminishing returns range except with regards to mastery and haste (where the undiminished stat will be superior). Also, note that the previously listed ilvl values do not assume diminished stats. Generalized secondary stat preferences are also not guaranteed to hold throughout the second diminishing returns range. Changing food buffs, enchants, and gems should be enough to rebalance your stats in extreme cases.
Trinkets
Upfront Recommendations
General-Use:
1. Almost Always: [Prophetic Stonescales]
2. If 2+ Allies are Using: [Whispering Incarnate Icon] / [Ominous Chromatic Essence]
3. Unconditional: [Fyrakk’s Tainted Rageheart] / [Neltharion’s Call to Suffering]
Situational-Use:
1. Consistent ST Damage with Pre-Ramp: [Cataclysmic Signet Brand]
2. Burst ST Damage: [Manic Grieftorch]
3. Shield External: [Ward of Faceless Ire]
(Note: Trinkets were generally assumed to be at their highest available ilvl for the purposes of these recommendations. Depending on the exact two trinkets involved, ilvl deviations may or may not change the ordering)
Trinket Details
For M+, there are a small handful of trinkets we will be considering based on their overall performance in encounters against various amounts of targets and their accessibility. The final listing is intended to provide enough alternative options to also support early gearing, though a few other trinkets beyond those listed in the recommendations are also discussed below if the reason for their absence wasn’t due to an obvious power gap.
[Prophetic Stonescales] – This is a fairly standard cheat death trinket on an 8 minute cooldown. While the effect triggering will make your character inactive for a few seconds, you will be immune to all attacks over the trigger duration, all enemies will receive a damage reduction effect, you will receive a haste buff, and you will retain any absorb effects you had before the lethal attack.
[Whispering Incarnate Icon] – At its weakest, this trinket provides nothing but passive versatility. However, our trinket gets empowered with a haste proc if the healer is also using this trinket and a critical strike proc if a dps role is using this trinket. Likewise, using this trinket is the only way to empower our party members’ trinkets with a versatility proc. So, the total value of us using this trinket will depend on how many are being used in our group, which affects not only the power of the trinket for us, personally, but also the amount of extra secondary stats provided to our group.
[Ominous Chromatic Essence] – Similar to [Whispering Incarnate Icon], the total power of this trinket is dependent on who else in your group is using it with different attunements, since this not only increases the total amount of secondary stats for you, personally, but also gives additional secondary stats to allies. In general, we would prefer to get Versatility out of this trinket, though Haste or Mastery are perfectly acceptable alternatives if Versatility is contested and, if enough people are using it, we are a potential candidate to use all stats; it is not worth using on Critical Strike under any circumstance.
[Fyrakk’s Tainted Rageheart] – A passive versatility with a passive immolation aura along with an on-use effect that gives the user a shield along with a pulsing AoE damage debuff effect. Both the immolation aura and the pulsing AoE effect hurt the player as well as enemies. All things considered, the healing of this trinket outweighs the self-damage, but not by an excessive amount. The immolation aura provides uncapped AoE damage that does not split, while the pulsing AoE debuff on-use effect splits damage with 15% increased total damage for every target after the first to up to 75% increased total damage. Due to the damage generally being more effective at smaller target counts, it can sometimes be worth delaying the use of this trinket by some amount of time if it will allow you to use it in a more efficient situation.
[Neltharion’s Call to Suffering] – In addition to having an item level advantage and passive versatility, this trinket provides an overbudgeted amount of strength through its proc effect. While the self-inflicted damage is a downside, the impact is mostly insignificant. The DoT application can technically be immuned with [Anti-Magic Shell] and the self-damage can also be absorbed from an active DoT effect, but absorbing this damage does not result in any RP generation.
[Cataclysmic Signet Brand] – A passive strength trinket with an exponentially ramping single target direct damage proc that continuously gets stronger as long as you don’t drop combat for a significant amount of time. For each stack you receive, proc damage increases multiplicatively by 20%. Given the proc rate and usual player haste ranges, it will generally take between 3 and 4 minutes of combat for the trinket to complete a full ramp. As such, the player’s ability to maintain stacks will have a SIGNIFICANT impact on how strong this trinket actually is. While [Control Undead] is active, your stacks will generally not expire even outside of combat, though there are some inconveniences with trying to leverage this in the current dungeon pool.
[Manic Grieftorch] – This trinket provides a strong burst damage effect that can perform single target burst damage more effectively than [Fyrakk’s Tainted Rageheart]. For the less desirable aspects, it either appears to have weaker AoE scaling than other trinkets or issues with its AoE hitbox, a two second channel time is needed for its use, and you can’t dodge, parry, or move during the two second channel. As for a few positive aspects, the cooldown reduction from allies dying can be beneficial (but it is not a reliable benefit), while the effect can still be directed mostly towards priority targets in multiple target pulls (though this is situationally a bad thing if AoE threat is being contested). It is not a trinket with good overall value, but if single target burst damage is needed, it can get the job done.
[Ward of Faceless Ire] – The overall healing and damage throughput on this trinket is very below average. The only explicit benefit it provides is that this trinket can be used to help group members survive specific burst damage mechanics should you be in a specific situation where that is relevant. If you need to ask the question of whether or not this is applicable to you, the answer is likely “no”, though it is pretty much the only option you have available to you that can meaningfully help allies survive predictable one-shots.
Overall
General-Use:
1. Almost Always: [Prophetic Stonescales]
2. If 2+ Allies are Using: [Whispering Incarnate Icon] / [Ominous Chromatic Essence]
3. Unconditional: [Fyrakk’s Tainted Rageheart] / [Neltharion’s Call to Suffering]
Situational-Use:
1. Consistent ST Damage with Pre-Ramp: [Cataclysmic Signet Brand]
2. Burst ST Damage: [Manic Grieftorch]
3. Shield External: [Ward of Faceless Ire]
(Note: Trinkets were generally assumed to be at their highest available ilvl for the purposes of these recommendations. Depending on the exact two trinkets involved, ilvl deviations may or may not change the ordering)
While cheat death trinkets do not lend themselves well to traditional model-based analysis, 8-minute cooldown cheat death trinkets like [Prophetic Stonescales] have historically been among the stronger M+ options when they have been available in the past (even on tank specs that are already using talented cheat death effects) and log data from patches 10.1.5 through 10.2.6 point to this trinket having some of the best player outcomes among all trinket options in M+. Cheat death trinkets thrive in environments where tank deaths due to incoming burst damage (as opposed to a lack of mitigation throughput) are one of the more prominent failure conditions for a given dungeon, which may vary from dungeon to dungeon, may depend on particular player skill level, and may be impacted by key level. It is up to the player to determine whether or not these conditions sufficiently apply to them, though previous data would indicate that it is very often worth using. At this time, it is recommended that, if you are using this trinket, you use it in addition to [Purgatory] and not as a replacement. If you only want to run one cheat death effect, [Purgatory], alone, is better than this trinket alone.
As previously explained, the overall value of [Ominous Chromatic Essence] and [Whispering Incarnate Icon] depends on how many allies are using it, but they have the potential to be two of the most valuable trinkets when used by at least two other people, given the amount of raw secondary stats being provided. Benefits are fairly well-rounded, though a portion of the benefits may be given to our allies and not ourselves.
[Fyrakk’s Tainted Rageheart] performs very well in Mythic+ despite having a large portion of the trinket’s benefits oriented towards single target damage and the healing being relatively inconsequential outside of meeting extremely short-term EHP checks. Furthermore, it is able to fulfill a very similar role to [Manic Grieftorch] if situations arise where burst damage has premium value, though it is not quite as proficient as some other options if burst damage is of supreme importance. Meanwhile, [Neltharion’s Call to Suffering] provides an overbudgeted stat benefit, though it does not compete with the group synergy stat trinkets if they are sufficiently empowered. The evaluation of both of these trinkets is similar enough that they come down to player preference; [Neltharion’s Call to Suffering] technically has more consistent offensive and defensive throughput, while [Fyrakk’s Tainted Rageheart] has more flexibility in dealing with specific situations, such as pull setup and predictable burst windows.
The situational trinkets are not expected to see much use, but are listed as tools that could be used to deal with specific types of situations should you run into very specific situations you would like to address (even if it comes at the cost of overall dungeon performance). While maintaining enough stacks to gain consistent value from [Cataclysmic Signet Brand] is questionable at best, if you are dealing with a problem that can only be helped with consistent single target damage (and you can reasonably guarantee that you can have max stacks in this situation), then [Cataclysmic Signet Brand] might be the best tool for the job. Similarly, [Manic Grieftorch] provides the best option for single target burst damage, while [Ward of Faceless Ire] gives you the ability to protect allies from predictable damage that could otherwise kill them (though efficiently preventing player from deaths with this trinket has a learning curve of its own). Again, these are not trinkets that are meant for general use, but they could be specific solutions to specific types of problems.
Enhancements
All item modifiers and consumable usage is handled in this section.
Runeforges
Death Knights have access to unique enchants for their weapons called runeforges that are stronger than traditional weapon enchants. Notable BDK options are listed below:
[Rune of the Fallen Crusader] – This runeforge provides a moderate amount of damage as well as minor mitigation and EHP benefits. This is the best general damage option.
[Rune of Hysteria] – This runeforge provides a decent amount of mitigation throughput and a larger RP pool, with only a minor, and indirect, increase to EHP. This is the best mitigation option.
[Rune of the Stoneskin Gargoyle] – This runeforge provides a moderate amount of EHP, a minor amount of mitigation, and a small amount of damage. This is the best EHP option.
[Rune of Saguination] – This runeforge can provide a large amount of single target damage, and a near-negligible amount of mitigation. The damage doesn’t scale with the number of targets, though it actually does 100% more damage to targets 20% health and lower. This is the best single target damage option, though it isn’t the best at this by a large margin and it quickly falls in value outside of this specific circumstance.
[Rune of Unending Thirst] – While on-kill effects aren’t particularly useful in M+, the one unique benefit provided by this runeforge is its movement speed bonus.
Runeforge Swapping
Weapon swaps can be made out of combat at no cost, so we can potentially weigh the merits of using certain runeforges pull by pull instead of dungeon by dungeon (if you have multiple comparable weapons to put different runeforges on, which isn’t always going to be the case). The same approach can be taken with strong weapons that have unique effects, when competitive weapons of that type appear and when they are swappable during an active dungeon. Properly executed, you can improve dungeon success with smart weapon swapping swapping over what you would gain by using any runeforge alone, though it *is* kind of a pain to do and the weapon requirements limit the strategy to a good extent.
Keep in mind, weapon swaps made while in combat will incur a 30 second [Off Balance] debuff, which temporarily disables runeforge bonuses. [Off Balance] will easily remove most of the potential benefits related to swapping. Additionally, buff and debuff effects related to runeforges instantly vanish when the related runeforge is unequipped. So, be careful about swapping at the wrong times.
General Recommendation:
(Multiple Weapons)
Hard Pull Flex Option: [Rune of the Stoneskin Gargoyle]
Single Target Flex Option: [Rune of Saguination]
Out of Combat Movement: [Rune of Unending Thirst] (On a +Speed Weapon)
Otherwise: [Rune of the Fallen Crusader]
(Single Weapon)
Unconditional: [Rune of the Fallen Crusader]
[Rune of the Fallen Crusader] is one of the most efficient ways to increase damage relative to the other options (see the Build Modifications section for more details on this), enough so that it should be the standard pick and likely the strongest option overall in 10.0 if no weapon swaps are being used. That being said, the ability to swap weapons mid-dungeon does mean that, with smart play, the benefits of other runeforges could be applied selectively to dungeon sections where they may be justified.
[Rune of the Stoneskin Gargoyle] is a reasonably efficient way to gain more EHP if you need it, and a case can be made for its situational use in mid-to-high level dungeons as a weapon swap option, specifically when burst damage deaths are the primary obstacle in certain dungeon segments as opposed to failures related to mitigation throughput (which should be rare in the current season). However, outside of these situations, the benefits of this runeforge are limited.
[Rune of Saguination] is not a very efficient way to increase single target damage over [Rune of the Fallen Crusader] under normal circumstances, given the tradeoffs involved, but, like everything else on this list, it can be situationally used in easier priority target situations to speed up the dungeon at little cost.
[Rune of Unending Thirst] is only used to shave a few seconds off of a key with a speed weapon when running between packs in a dungeon when out of combat, if the player finds this level of micro-management acceptable. The gains are minor, but they are free for the taking if you want to exert the effort.
While Mitigation is generally desirable in M+, the mitigation being provided by [Rune of Hysteria] comes at a high cost relative to the damage gains of [Rune of the Fallen Crusader], and, even for weapon swapping purposes in a particularly dangerous dungeon segment, [Rune of the Stoneskin Gargoyle] is more likely to better perform that job given the almost excessively high resources of BDK’s in 10.0 and current dungeon tuning. As such, it is hard to make a case for its use even situationally at this time. Granted, if you wanted to make a build variation in the direction of more mitigation relative to the standard recommendations, this is pretty much the only option available that isn’t already recommended.
Enchants
General Recommendations:
Ring – [Devotion of Versatility]
Versatility is currently the recommended stat for reasons previously explained.
Chest – [Sustained Strength]
The choice between these two chest enchants is mostly an EHP vs. Damage tradeoff and, given the amount of stamina we are being offered relative to the strength that is being lost, [Sustained Strength] will generally be the superior option in M+.
Cloak – [Writ of Speed]
Bracers – [Devotion of Speed]
You can choose between more speed (a miscellaneous benefit) or more mitigation with leech. While the benefits of these enchant options are not directly comparable, historical player preference and large-scale log analysis both indicate speed is associated with the best key outcomes.
Boots – [Plainsrunner’s Breeze] or [Watcher’s Loam]
You can choose between more speed (a miscellaneous benefit) or more EHP with stamina. These benefits are not directly comparable with traditional analysis methods and they provide a small enough benefit that it is difficult to determine the best choice through large-scale log analysis with a high amount of confidence, so feel free to pick according to personal preference. Earlier Dragonflight patches have shown a player preference towards the stamina enchant, though the fixed stamina effect gets relatively weaker with each patch due to overall stamina inflation (which is not as true of the speed enchant).
Legs – [Fierce Armor Kit]
The main tradeoff between “enchants” in this slot is armor vs. stamina vs. a very small amount of versatility (with less strength than the other two options). At current tuning, the stamina option is the favorable option in all situations and the competition isn’t particularly close.
Belt – [Shadowed Belt Clasp] and [Nitro Boosts]
There is only one normal belt enchant, so there is not much to consider with it; engineering tinkers can also be applied in addition to enchants.
In M+ dungeons, [Nitro Boosts] provides a 70% movement speed buff with an 8 second duration on a 2 minute cooldown (it will put potions on cooldown for 1 minute) and it does not conflict with the regular belt enchants. It will never backfire in M+. This is an exceptionally useful benefit for an otherwise slow tank class in many situations, but especially when setting up pulls.
Gems
General Recommendation: [Resplendent Illimited Diamond] then [Zen Malygite]
The same reasoning as the ring enchants applies here, though, with gems in particular, there are two different considerations. First, there is a unique primary stat and secondary stat gem that you are allowed to only use one of, which is generally going to be better than other options. Second, hybrid secondary stat gems provide significantly more additional stats in comparison to singular secondary stat gems, so they are generally the superior option given that our two best secondary stats are close in overall value.
Consumables
General Recommendations:
Phial – [Phial of the Tepid Versatility]
The higher increased primary stats associated with later expansion seasons greatly benefited [Phial of the Tepid Versatility] at the expense of the other phial options, which made a once contested decision a lot more straightforward. As such, there is not much reason to deviate from [Phial of the Tepid Versatility] at this time.
Food – [Great Cerulean Sea]
Food buffs are heavily biased towards secondary stat bonuses, and the dual-secondary stat food provides significantly more total stats than singular secondary stat food. Given current stat values, the Vers/Mastery food is expected to offer the best combined benefits compared to other food options.
Weapon Supplement – [Hissing Rune]
The mastery from [Hissing Rune] is generally going to provide more overall value than the attack power from a [Primal Weightstone] or [Primal Whetstone] and it is preferable to the haste and critical strike rune options.
Potions – [Potion of the Hushed Zephyr] / [Bottled Putrescence] / [Potion of Shocking Disclosure] / [Elemental Potion of Ultimate Power] / [Potion of Gusts]
- Invisibility is a top priority when necessary to enable better routing, while [Potion of Gusts] can situationally be used for very specific skips and pulls.
- Beware of locking out your [Nitro Boosts] cooldown if you are using that tinker effect!
- [Potion of Shocking Disclosure] is only potentially used on particularly large pulls with no priority targets or as a dungeon pre-pot. Otherwise, [Elemental Potion of Ultimate Power] will now beat out other combat potions under most circumstances due to it scaling better into the higher item levels of Season 3 with no consumable updates.
About the Author


Superb!