![tbc classic horde leveling guide blade’s edge mountains [level 67 68]](https://www.warcrafttavern.com/wp-content/uploads/2021/11/TBC-Classic-Horde-Leveling-Guide-Blades-Edge-Mountains-Level-67-68-1024x400.jpg)
- Author: DanielD
- Date: November 17, 2021
- Updated: November 18, 2021
- Expansion: TBC Classic


The dreaded Blade’s Edge Mountains have some long travel times, but we’ll do our best to get you through them as quickly and painlessly as possible!
Part 1
- If you aren’t yet in Zabra’jin, return to Garadar, catch a flight to Zabra’jin in Zangarmarsh. On the 2nd floor of the inn, talk to Shadow Hunter Denjai and accept
 The Ogre Threat.
 - Fly to Swamprat Post, then take follow the road west (keep going west at the fork to hit the road again) and then north past Telredor to reach an uphill path (69.2, 37.5) that leads to a tunnel that will take you through the mountains. Speak to Grunt Grahk at the tunnel entrance to accept Killing the Crawlers.
- Go through the tunnel and make sure you kill at least 6 Cavern Crawlers.
- Once you exit the tunnel, you’ll be in the Blade’s Edge Mountains! If you aren’t, you did something wrong. Go due north to reach Thunderlord Stronghold (52, 59):
- See Nekthar to turn in
 The Ogre Threat.
 - Talk to Tor’chunk Twoclaws to turn in Killing the Crawlers, accept The Bladespire Threat.
- accept Felling an Ancient Tree from the Wanted Poster, which is in front of the nearby bonfire.
- Speak with Gor’drek to accept The Encroaching Wilderness.
- Make the inn your new home by speaking with Gholah, who is in the large building uphill from the quest givers.
- Grab the flight path.
- See Nekthar to turn in
- Leave the town heading south, you’ll soon find Bladewing Bloodletters; kill 12 for The Encroaching Wilderness.
- Return to Thunderlord Stronghold and speak with Gor’drek to turn in The Encroaching Wilderness, accept Dust from the Drakes.
- Now leave town again, but this time head out the western gate and follow the road north down the mountainside. Take a left once you enter Dragon’s End and reach the valley floor to enter the Bladespire Grounds — start killing the Bladespire Ogres and Bladespire Raptors here, and make sure you save any Raptor Ribs you collect (you’ll need 3 for an upcoming quest). Eventually, one of the Bladespire mobs will a Thunderlord Clan Artifact, right-click it to accept Thunderlord Clan Artifacts. Once you’ve cleared the mobs here, keep going even if you haven’t completed The Bladespire Threat yet — there will be more ogres to kill.
- Make your way west and you’ll quickly reach Bladespire Hold:
- You’ll see a banner next to a bonfire at the entrance. Head past the banner and find the 3rd hut on the right, just to the right of the main building. Enter the hut (41.3, 47) and grab the Thunderlord Clan Tablet.
- Go due south to the large flat stone you can climb (41.5, 52.6). Get on top of the altar to find the Thunderlord Clan Arrow.
- From the top of the stone altar, look south, and head to the hut that’s to the right of the larger building. Enter the hut and collect the Thunderlord Clan Drum.
- Now stay in the Bladespire area until you’ve completed The Bladespire Threat.
- Go northeast through Dragon’s End and back up the path we came down on back to return to Thunderlord Stronghold:
- Talk to Tor’chunk Twoclaws to turn in The Bladespire Threat, accept The Bloodmaul Ogres.
- Find Rokgah Bloodgrip to turn in Thunderlord Clan Artifacts, accept Vision Guide.
- While still near Rokgah, right-click your Fiery Soul Fragment, and enjoy the ride. When your vision quest is finished, speak with Rokgah again to turn in Vision Guide and accept The Thunderspike.
- Talk to Tor’chunk Twoclaws to turn in
- Leave town heading south, then take the road west to cross the bridge and enter the Living Grove. Start killing Fey Drakes for their Dust while you’re here.
- Once you’ve crossed the bridge, head southwest to find the road that runs north/south, and then search for Stronglimb Deeproot, who patrols the road between Sylvanaar and the cave south of the city. Start your search by going north to the gates of Sylvanaar, then head south on the road. Kill the big old tree and take his Trunk. Stay in the grove until you’ve completed Dust from the Drakes.
- Head down into the Bloodmaul Ravine via the path in the southeast of the grove (68.9, 76.5):
- When the path forks near the bottom, take a left and then head northeast — you should quickly find T’chali the Witch Doctor (45, 75.3) buried in the sand. Speak with him to accept They Stole Me Hookah and Me Brews! Start looking for Bloodmaul Brutebane Brew barrels as you continue with this section.
- Go south to the cave with the big crystals, you can’t miss it; you’ll find Tchali’s Hookah outside of the entrance (42.1, 81.2), at a camp with a tent and a fire. Enter the cave and find The Thunderspike at the end. Get cooldowns and hp/mana, then attempt to loot The Thunderspike. Gor Grimgut will show up to stop you, stop him (from living) and then loot The Thunderspike from him.
- Complete They Stole Me Hookah and Me Brews! Also grab one extra Bloodmaul Brutebane Brew (for a total of 11). The Bloodmaul Brewmasters will drop the brew, and you can find barrels of it if you go to the larger Bloodmaul camp that’s on the eastern side of the ravine.
- Return to T’chali and turn in They Stole Me Hookah and Me Brews!, accept Bladespire Kegger.
- When the path forks near the bottom, take a left and then head northeast — you should quickly find T’chali the Witch Doctor (45, 75.3) buried in the sand. Speak with him to accept
- Go north under the bridge to reach Bladespire Hold. Find an ogre, and get just outside of aggro range. Right-click your Bloodmaul Brutebane Keg (which is different than the brew, the keg will have 10 charges)– you can back off the ogre, or kill it, once they drink the keg (you’ll get a quest update). Get 4 more ogres drunk (if you can avoid killing one, you can get it drunk again) and you’ll be done with Bladespire Kegger.
- Go back to T’chali again to turn in Bladespire Kegger, accept Grimnok and Korgah, I Am For You!
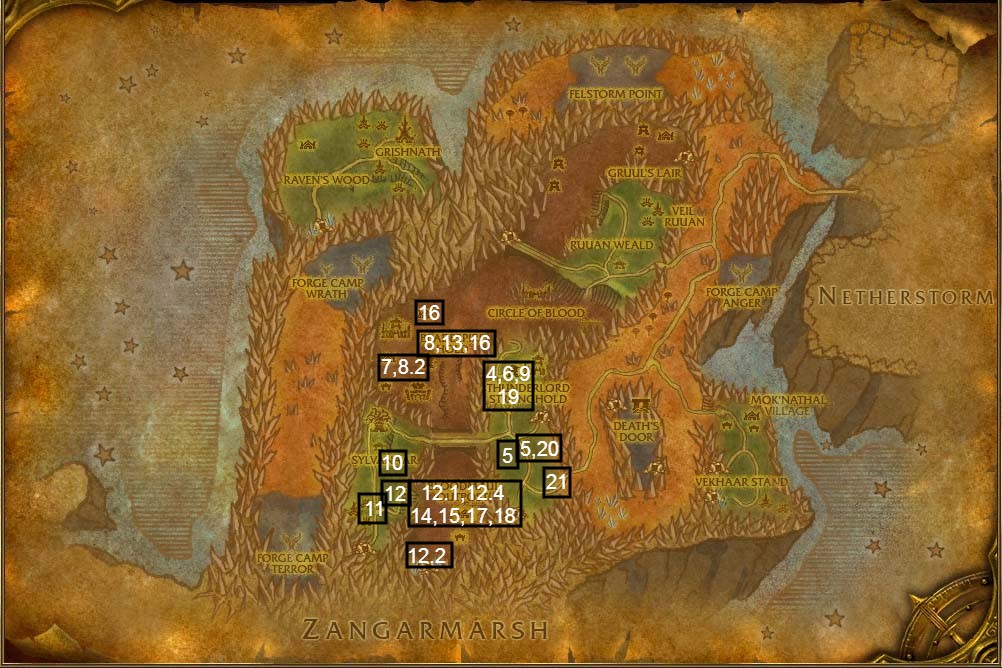
- Go southeast to the nearby Bloodmaul Outpost, and continue south to reach the tower at (45, 80). Fight your way to the top and defeat Grimnok Battleborn. If you don’t have your extra Bloodmaul Brutebane Brew, there’s usually some at the top of the tower by Grimnok. Note that if you’ve already completed The Bloodmaul Ogres, or are close, you can take a shortcut to get to the tower without going through the whole camp:
Head south past the main gate 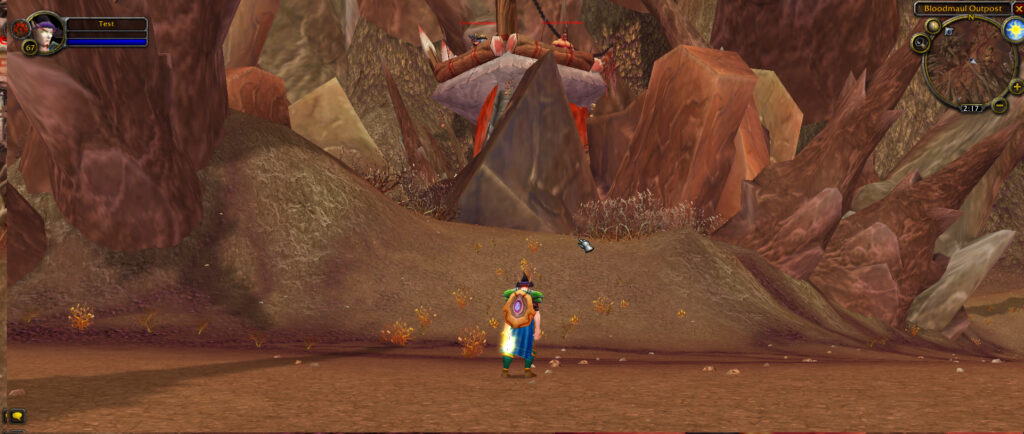
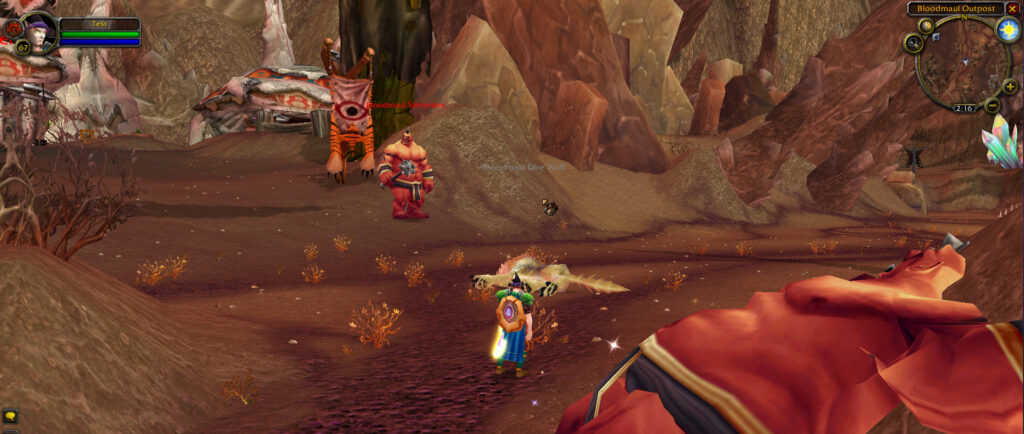
Find these rocks in front of where you can see the tower 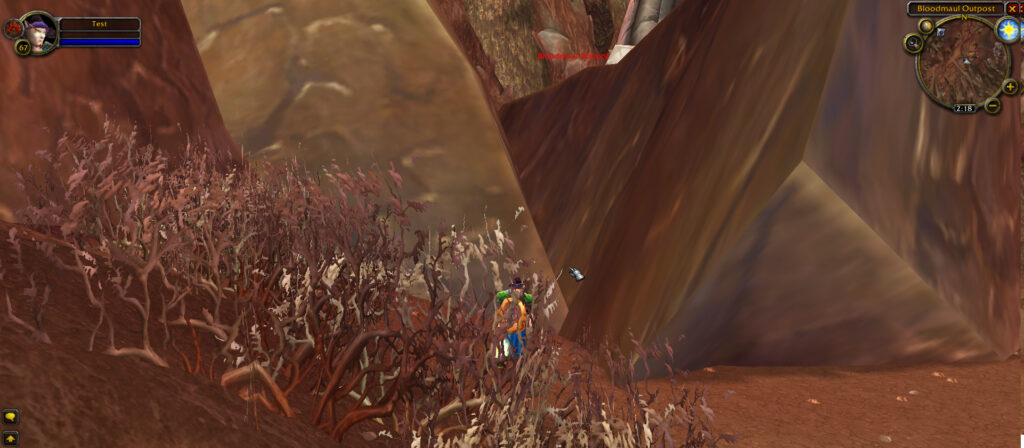
Go to this gap by the bushes 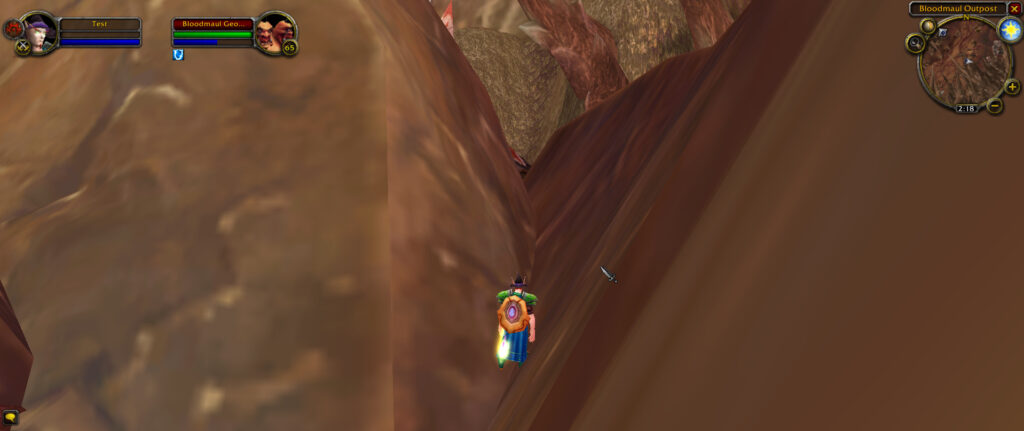
Jump a bunch of times and you’ll end up on the other side

- Now go north again and return to Bladespire Hold. From the main entrance (44, 53), follow the path to the right to find the two story house at (43, 47). Go up the ramp on the left side of the house. Inside, Korgaah is guarded by two elite ogres. They don’t like drinking, so you can use your Bloodmaul Brutebane Brew to pull Korgaah and kill him.
- Head south to return once more to T’chali. turn in Grimnok and Korgah, I Am For You! and accept A Curse Upon Both of Your Clans! Never kill a Witch Doctor without dispelling their spirit, I guess.
- Head southeast back to the Bloodmaul Outpost. Stand in front of whatever building is convenient, get full hp and mana, then right-click your Wicked Strong Fetish. It will spawn a Bloodmaul Evil Spirit — kill it. Repeat this process at a different building, or wait until the spooky orc face in front of the building goes away (if you don’t wait and summon the spirit at the same building, you’ll have to fight two spirits at once). If you haven’t yet completed The Bloodmaul Ogres, stay here and do so before moving on.
- Hearthstone to Thunderlord Stronghold:
- See Tor’chunk Twoclaws to turn in The Bloodmaul Ogres and Felling an Ancient Tree.
- Talk to Rokgah Bloodgrip to turn in The Thunderspike. A brief conversation between NPCs will occur, then you can move on.
- Talk to Garm Wolfbrother to accept The Spirits have Voices.
- Turn around and go see Rexxar to turn in The Spirits Have Voices and accept Whispers on the Wind.
- Speak with Gor’drek to turn in Dust from the Drakes, accept Protecting Our Own.
- See Tor’chunk Twoclaws to turn in
- Leave Thunderlord Stronghold heading south and you’ll quickly find Thunderlord Dire Wolves. Use Gor’drek’s Ointment on 5 wolves to complete Protecting Our Own.
- Take the road south, and go east (left) at the second fork to follow the path through the mountains at (55, 73). Continue on the road, and once it curves east, start looking for Scalewing Serpents; kill them until you’ve collected 3 Serpent Flesh. Make sure you take a right to continue east at the fork. If you didn’t see enough Scalewings and you find the path downward into the village, take a right when you’re facing the path downward to enter Scalewing Shelf; you should be able to collect the rest of the Serpent Flesh you need easily here.
Part 2

- Eventually you’ll reach Mok’nathal Village (73, 62):
- Hang a left when you go in and speak with Dertok to accept The Stones of Vekh’nir.
- See Leoraxx to turn in Whispers on the Wind, accept Reunion.
- Talk to Silmara to accept The Softest Wings.
- See Taerek to accept Silkwing Cocoons. From now on, you’ll want to kill Silkwing Larva unti you finish this quest and the previous one. You’ll finish this quest and The Softest Wings faster if you let the larva finish their metamorphosis, as you can sometimes get both the Silkwing Cocoon and the Iridescent Wings you need.
- In the building to the left of Taerek and Silmara, find Matron Varah to accept Mok’Nathal Treats, and then immediately turn in Mok’Nathal Treats.
- Head to the southern part of the village and get the new flight path.
- Hang a left when you go in and speak with Dertok to accept
- Leave the village and go southeast to reach Veil Vekh (76, 72). Kill arrakoa and one will eventually drop a Vekh’nir Crystal. Go to the purple arcane circle in the middle of the veil and right-click your new Vekh’nir Crystal. After channeling, you should receive a Charged Vekh’nir Crystal.
- Return to Mok’Nathal:
- Talk to Derktrok to turn in The Stones of Vekh’nir. After a bit of dialog, you can then accept Trial and Error.
- Next, see Leoroxx to accept Understanding the Mok’Nathal.
- Talk to Derktrok to turn in
- Leave the village and this time head southwest to the western side of Vekhaar Stand. You’ll reach the top of a hill with ogres and arrakoa: kill more arrakoa here until one drops an Infused Vekh’nir Crystal. Now right-click Dertrok’s Wand Case in your inventory. Find an ogre and use Dertrok’s First Wand on it — he’ll become friendly and follow you around for 2 minutes.
- Enter the nearby cave to the west and go left (straight) and downhill at the fork. Find and kill Vekh at the end of the cave.
- Leave the cave, and if you don’t have 3 more Infused Vekh’nir Crystals, kill more arrakoa until you have them, and use the rest of Dertrok’s wands on the nearby ogres to complete Trial and Error.
- If you haven’t completed The Softest Wings and Silkwing Cocoons, do so as you make your way northeast back to Mok’nathal Village:
- Talk to Silmara to turn in The Softest Wings.
- See Taerek to turn in Silkwing Cocoons.
- Speak with Dertrok to turn in Trial and Error, accept Ruuan Weald.
- Find Leoroxx to turn in Understanding the Mok’Nathal and accept Since Time Forgotten…
- See Spiritcaller Dohgar to accept The Totems of My Enemy.
- Talk to Silmara to turn in
- Leave the village and head west on the road up into the mountains, stay on the road and take a left at the fork to continue west. You’ll soon reach the Bladespire Outpost (60, 55). Fight your way to the northwest of the outpost and kill Gnosh Brognat (57.1, 54.5). Stay here killing ogres until you’ve collected 5 Bladespire Totems.
- Return to Mok’nathal Village:
- See Leoroxx to turn in Since Time Forgoten… and accept Slay the Brood Mother.
- Talk to Spiritcaller Dohgar to turn in The Totems of My Enemy and accept Spirit Calling.
- See Leoroxx to turn in
- Leave the village heading west again, but this time go due south once you go through the mountains. You’ll pass through the Scalewing Shelf and eventually reach the Singing Ridge. While here:
- Find Lesser Nether Drakes and drop a Spirit Calling Totem. Kill the drakes while near the totem (you’ll know you’re close enough if you have the Spirit Calling buff). You need to collect 8 Lesser Nether Drake Spirits to complete Spirit Calling. Since you have 5 totems, make sure you don’t waste them — that being said, it should be easy to collect what you need, since the totems last for 2 minutes and you can drag drakes towards them.
- Find ‘n kill the netherdrake Dreadwing around (63, 77), — note Dreadwing is immune to shadow damage, and cannot be stunned.
- Find Lesser Nether Drakes and drop a Spirit Calling Totem. Kill the drakes while near the totem (you’ll know you’re close enough if you have the Spirit Calling buff). You need to collect 8 Lesser Nether Drake Spirits to complete
- Return once more to Mok’nathal Village:
- Talk to Leoroxx to turn in Slay the Brood Mother.
- Speak with Spiritcaller Dohgar to turn in Spirit Calling, accept Gather the Orbs.
- Talk to Leoroxx to turn in
- Depart the village going west, and follow the road, taking a right at the fork to head north. You’ll soon see Razaan’s Landing (68, 47) on your left. Enter the base and look for the Razaani Light Orbs. Find the glowing pink balls, and then use the Orb Collecting Totem near them until you’ve caught 15 of them.
- Go north and slightly east of Razaan’s Landing (you can follow the road north) and kill Fel Corrupters. One will eventually drop a Damaged Mask — click it in your inventory to accept Damaged Mask.
- Get back on the road and go north, then take a left at the fork to go west down the mountain and into Evergrove:
- When you enter, talk to O’Mally Zapnabber to turn in Damaged Mask, accept Mystery Mask.
- Speak to Tree Warden Chaw to accept A Time for Negotiation…
- Get the new flight path.
- Speak with Timeon to turn in Ruuan Weald, accept Creating the Pendant.
- Now see Wildlord Antelarion to turn in Mystery Mask, don’t accept Felsworn Gas Mask yet.
- Talk with Faradrella to accept Culling the Wild.
- Find Mosswood the Ancient to accept From the Ashes and Little Embers.
- When you enter, talk to O’Mally Zapnabber to turn in
- Take a flight to Thunderhold Stronghold:
- Speak to Gor’drek to turn in Protecting Our Own.
- See Rexxar to turn in Reunion and accept On Spirit’s Wings.
- Speak to Gor’drek to turn in
- Leave the town and go on the road north to go down the mountain. Continue northeast, keeping the Circle of Blood on your right, to pass under the bridge. Right after you pass under the bridge, look to your and right you’ll find two ogres talking near (57, 31). Get close enough to use Rexxar’s Whistle in such a way that you can get both ogres in the green circle, then use it to call the hawk Spirit — he’ll eavesdrop for you and complete On Spirit’s Wings.
- Hearthstone to Thunderlord Stronghold and speak with Rexxar to turn in On Spirit’s Wings and accept Baron Sablemane.
- Take the road north from town and continue north until you reach the valley floor. Look north to see the Circle of Blood. Go around the building to the left to find Baron Sablemane. Speak with him to turn in Baron Sablemane, accept Into the Churning Gulch.
- Turn around after talking to Sablemane and you’ll see a path to your west that is part of the Churning Gulch (50, 42). Start killing Crust Bursters, and don’t stop until you have 7 Crust Burster Venom Glands.
- Return to Baron Sablemane and turn in Into the Churning Gulch, accept Baron Sablemane’s Poison.
- Go south, back to Thunderlord Stronghold:
- See Rexxar to turn in Baron Sablemane’s Poison and accept The Smallest Creatures.
- Speak with Tor’chunk Twoclaws (love this guy’s name) to accept Crush the Bloodmaul Camp.
- See Rexxar to turn in
- Once again we’re going to go north into the valley. Continue north to reach the Bloodmaul Camp, which will be on your left. Look to the left of the entrance of the camp to find the marmot den at (56.5, 29.3). Right-click the Kodohide Drum Rexxar gave you to coax a marmot into being your buddy (which really means you’re magically in control of the marmot now). You’ll have a new action bar now — use Stealth to make sure your marmot friend is sneaky-like, and then proceed to the Bloodmaul Camp northwest of the marmot den. If there are any mobs in your way, you can use the marmot’s Acorn Toss to make them turn around so you can go past them.
- Once you’re a marmot:
- Enter the camp and go left, but make sure you avoid the sleeping worg. Past the worg, find the keg of Ripe Moonshine (55.3, 28.2) and use your marmot’s Poison Keg ability.
- Next, turn around and go past the building then turn left and go towards the bonfire, you’ll see the Green Spot Grog (55.3, 26), poison that keg too! You’ll need to throw an acorn at the ogre that stands in front of it to distract him.
- Last but not least poisoned, go a bit more north past the entrance of the building to find the Fermented Seed Beer keg on the left side of the base of the tower, and poison it.
- When you’ve poisoned all 3 kegs, right-click away the Coax Marmot buff to return to your body. NOTE: If you’re having trouble finding the kegs, just do step 24 and locate them all, then come back and do this part.
- As if poisoning them wasn’t enough, you’re going to kill them the old fashioned way now. Go to the camp your marmot was just in and kill ogres until you’ve completed Crush the Bloodmaul Camp.
- Head southwest and then south to find the pass up the mountains to return to Thunderlord Stronghold:
- See Tor’chunk Twoclaws to turn in Crush the Bloodmaul Camp.
- Speak with Rexxar to turn in The Smallest Creatures, accept A Boaring Time for Grulloc.
- See Tor’chunk Twoclaws to turn in
- OK, right back down into the valley! This time we’re going to turn right at the Circle of Blood and head east as far as we can to reach the Cursed Hollow and find Grulloc (60.9, 47.6), who’s hard to miss as he’s a giant gronn. Get close to Grulloc, but don’t aggro him, and right-click Huffer’s Whistle in your inventory. While Huffer is distracting Grulloc, steal Grulloc’s Sack by looting it, then run!
- Head to the western side of the Circle of Blood to speak with Baron Sablemane, turn in A Boaring Time for Grulloc and accept It’s a Trap!
- Head southwest to Bladespire Hold. This is going to be just like the last time we cursed ogres: Stand in front of whatever building is convenient, get full hp and mana, then right-click your Wicked Strong Fetish. It will spawn a Bladespire Evil Spirit — kill it. Repeat this process at a different building, or wait until the spooky orc face in front of the building goes away (if you don’t wait and summon the spirit at the same building, you’ll have to fight two spirits at once). You have to do it 5 times here, however.
- Head south through the valley and under the bridge to reach T’Chali the Witch Doctor, turn in A Curse Upon Both of Your Clans!
Part 3
- Hearthstone back to Thunderlord Stronghold:
- Speak with Rexxar to turn in It’s a Trap! and accept Gorgrom the Dragon-Eater.
- See Tor’chunk Twoclaws to accept Slaughter at Boulder’mok.
- Speak with Rexxar to turn in
- Take a flight to Mok’nathal Village:
- Talk to Spiritcaller Dohgar to turn in Gather the Orbs, accept Inform Leoroxx!
- Now go see Leoroxx nearby to turn in Inform Leoroxx! and accept There Can Be Only One Response.
- Talk to Spiritcaller Dohgar to turn in
- Fly to Evergrove (the Mok’nathal flightmaster is in the south of the village), and make the inn there your home.
- Go to the road west of Evergrove, and start looking for Overseer Nuaar, a draenei who patrols a route north-south that begins west of Veil Ruuan and finishes at the southern edge of the plateua, going through all the poacher camps (with the little tents). You can use a “/target overseer” macro to make it easier to find him, and also make sure you have NPC nameplates turned on. Start at the southernmost camp and make your way north. Once you find him, speak with him to complete the objective of A Time for Negotiation… then return to Evergrove.
- In Evergrove:
- See Tree Warden Chawn to turn in A Time for Negotiation… and accept …and a Time for Action.
- Speak with Samia Inkling to accept Poaching from Poachers.
- See Tree Warden Chawn to turn in
- Leave town heading west, and you’ll soon reach a Wyrmcult camp. Then go north killing Wyrmcult Poachers until you’ve collected 5 Wyrmcult Nets for Poaching from Poachers. Also kill Wyrmcult Hewers for …and a Time for Action. A Wyrmcultist should eventually drop a Meeting Note — read it to accept Did You Get The Note? Keep at it until you’ve completed both quests.
- Go northeast to Veil Ruuan. Kill arrakoa until you’ve collected 6 Ruuan’ok Claws, then head to the green arcane circle in the middle of the pond. Clear the area, get full hp/mana and important cooldowns, then right-click the Ruuan’ok Claws in you rinventory. This will summon a Harbinger of the Raven — kill it and grab its Harbinger’s Pendant.
- Head back to Evergrove:
- Talk to Timeon to turn in Creating the Pendant, accept Whispers of the Raven God.
- See Tree Warden Chawn to turn in …and a Time for Action and Did You Get The Note?, accept Wyrmskull Watcher.
- Speak with Samia Inkling to turn in Poaching from Poachers, accept Whelps of the Wyrmcult.
- See Wildlord Antelarion and accept Felsworn Gas Mask. Now hurry to complete the next step, because after an hour your mask will be destroyed.
- Talk to Timeon to turn in
- Take the road that runs east up into the mountains (NOTE: Once you’re up on the plateau, kill any Felsworn Scalewings, Felsworn Daggermaws, or Fel Corrupters you find to complete Culling the Wild). Stay on the road and turn right at the fork to reach Forge Camp Anger:
- Fight your way up the ramp that leads into the camp, then turn left to find the Legion Communicator (73.3, 40.1). Equip the Felsworn Gas Mask (note that you can’t do this shapeshifted or mounted). Then right click the Legion Communicator (it should have a quest marker on it once you equip the mask) to turn in Felsworn Gas Mask and accept Deceive thy Enemy.
- Kill the enemies required for your new quest (they should all be in the camp), then return to the communicator to turn in Deceive thy Enemy and accept You’re Fired!
- Go to the front of the camp and kill 5 Anger Guards — they should each drop a Camp Anger Key— and then use them to activate the 5 obelisks in the camp. This will spawn Doomcryer, who will spawn from the portal the obelisks sent little fireballs towards. She is soloable but can be a challenge for some classes. Fire resistance will help, and you’ll want to try to pull it to a safe spot, as the mobs respawn rather quickly in the camp.
- Fight your way up the ramp that leads into the camp, then turn left to find the Legion Communicator (73.3, 40.1). Equip the Felsworn Gas Mask (note that you can’t do this shapeshifted or mounted). Then right click the Legion Communicator (it should have a quest marker on it once you equip the mask) to turn in
- Head southwest on the road to reach Razaan’s Landing, and start killing Razaani. Once you kill enough Razaani, Nexus-Prince Razaan will come through the stargate at (66.4, 44.1) in the middle of the camp. Kill him and loot the cube that appears above his corpse to get the Collection of Souls.
- Leave the camp and head north, continuing to complete your objectives for Culling the Wild if needed. Once the road curves east, continue north off the road to make your way to Skald (71, 21). You need to plant Ironroot Seeds in 3 places: (71.6, 22.3), (71.6, 20.3), and (71.6, 18.5). If you run north from where the road curves you’ll easily hit the first spot for the seeds, and the rest are in a straight line north. You’ll also want to kill Scorch Imps forLittle Embers.
- Hearthstone back to Evergrove:
- Talk to Mosswood the Ancient to turn in Little Embers and From the Ashes.
- See Faradrella to turn in Culling the Wild.
- Speak to Wildlord Antelarion to turn in You’re Fired!, accept Death’s Door.
- Talk to Mosswood the Ancient to turn in
- Leave Evergrove and follow the road west across Wyrmskull Bridge. Find Watcher Moonshade at the other end, speak to her to turn in Wyrmskull Watcher, accept Longtail is the Lynchpin.
- Enter the tunnel behind Moonshade, fight your way to Draaca Longtail and slay her. Then return to Watcher Moonshade to turn in Longtail is the Lynchpin and accept Meeting at the Blackwing Coven.
- Enter the tunnel once more, and kill Wyrmcult members as you make your way through the tunnel to the exit. Once you leave the tunnel, go right at the fork to reach Grishnath (42, 22). Now you’ll need to kill arrakoa until you get the Understanding Ravenspeech buff. You should also find the Orb of the Grishna as you kill arrakoa, you can right click it to accept The Truth Unorbed — don’t leave this area until you’ve gotten the quest. Once you get the Ravenspeech buff, look on your minimap for the prophecies (they are totems):
- On top of a tree tower at (39, 17)
- On top of a tree tower at (42.4, 21.6)
- On the ground near the swamp at (40.7, 18.6)
- In the south of the camp at (40.2, 23)
- Leave the veil and go southwest along the road to a nearby cave (31, 32):
- Before you enter the cave, make some bag space if you don’t have any or you’ll be unable to catch the whelps you need. Clear your way into the cave, stick to the right side, and use the Blackwhelp Net on Wyrmcult Blackwhelps. The easiest way to find enough whelps is to walk on the eggs you find on the ground.
- Continue through the cave, staying right, and you’ll find Kolphis Darkscale. Go into your inventory and right-click your Costume Scraps stack (you need 5, so go kill more Wyrmcult members if you don’t have enough) to create an Overseer Disguise. Put it on and go speak with Kolphis. If you’re a slow reader, you might need to skip a few lines of dialogue as your costume will expire in 3 minutes. Leave the cave, but capture any last Wyrmcult Blackwhelps you need before leaving.
- Hearthstone to Evergrove:
- Talk to Tree Warden Chawn to turn in Meeting at the Blackwing Coven and The Truth Unorbed, accept Maxnar Must Die! and Treebole Must Know.
- Speak with Samia Inkling to turn in Whelps of the Wyrmcult.
- Speak with Timeon to turn in Whispers of the Raven God.
- Talk to Tree Warden Chawn to turn in
- Cross the bridge and go through the tunnel again (you can stick to the left and avoid combat now if you want), keep following the road until you find Treebole (36.6, 23.2) at the fork. Speak with him to turn in Treebole Must Know and accept Exorcising the Trees.
- Head northeast to Grishnath and:
- Collect 5 Grishnath Orbs — they can be found in the treehouses in the northeast of the camp, just look for purple balls on pedestals.
- Now go south on the road and then head left into the trees near (34, 26), you should be able to find the Dire Ravens you need to kill for their Dire Pinfeather — you’ll need 5.
- Once you have a Dire Pinfeather, right click a Grishnath Orb to create an Exorcism Feather. Find a Raven’s Wood Leafbeard and use the Exorcism Feather on it, then nuke the Koi-Koi Spirit that spawns; the Leafbeard will turn friendly once the spirit is dead. Repeat 5 times to complete this quest, then return to Treebole (36.6, 23.2) to turn in Exorcising the Trees.
- Go west towards Boulder’mok and find Gorgrom’s Altar (30.6, 22.2). Kill ogres around the altar until you’ve collected 3 Grisly Totems. Right click the altar to summon Gorgrom, who will die to Sablemane’s trap. Then right-click the totems in your inventory to complete the objectives for Gorgrom the Dragon-Eater. Keep killing ogres until you’ve completed Slaughter at Boulder’mok.
- Leave those dead ogres behind and head south to the Wyrmcult cave, we’re going to complete Maxnar Must Die! To find Maxnar (33.9, 35.3), you go right when you enter the cave, and you’ll need to stay to the left of the tunnel if you don’t want to fight Kolphis. Note that there’s a few couple to do this quest:
- Make another Overseer Disguise (scraps should still drop from the Wyrmcult members if you need more) and you can make your way through the cave without getting attacked.
- Impatient? Kill your way to Maxnar, then kill Maxnar.
- Hearthstone to Evergrove and speak with Tree Warden Chawn to turn in Maxnar Must Die!
- Take a wyvern to Thunderlord Stronghold:
- Speak with Rexxar to turn in Gorgrom the Dragon-Eater, accept Prisoner of the Bladespire.
- See Tor’chunk Twoclaws to turn in Slaughter at Boulder’mok.
- Speak with Rexxar to turn in
- This part is optional, but the rewards are worth it so you should definitely try to complete it. Start looking for a group for Prisoner of the Bladespire and Showdown. While you wait, Aldor players can grind demons at Forge Camp Anger for rep. The fire elementals in Skald can be decent for earning gold. Once your hearthstone is up, you could also proceed to the next step in the guide and hearthstone to Evergrove once you get a group. Here’s what you’ll need to do for Prisoner of the Bladespire and Showdown:
- Head north on the road from Evergrove, and head down into the valley. Then go northeast to Gruul’s Lair and start killing Bladespire Enforcers and Battlemages until one of them drops a Wyvern Cage Key. Be prepared to do this for a while, as the drop rate is fairly low. Once someone has the key, the person with it needs to go to Leokk’s Cage (65.7, 20.2) and stand beneath it. To find the cage, stand at the big bonfire in the middle of the camp, then look north and up. Then, the person with the key uses Spirit’s Whistle to complete Prisoner of the Bladespire.
- Return to Thunderlord Stronghold and speak with Rexxar to turn in Prisoner of the Bladespire, accept Showdown. If you group didn’t stay together, get a new one for this step. Go back to Gruul’s Lair and this time find the Altar of Goc (64.1, 18.5). It can be hard to find — it’s between the first tower on your left and the first hut on your left when you enter Gruul’s Lair, up on a small hill. When you’re all ready, use Rexxar’s Battle Horn to summon Goc. Make sure no one in your party puts any damage into Goc for the first few moments of the fight, to let Rexxar get threat. Once you’ve killed Goc, return to Thunderlord Stronghold and speak with Rexxar to turn in Showdown.
- Head north on the road from Evergrove, and head down into the valley. Then go northeast to Gruul’s Lair and start killing Bladespire Enforcers and Battlemages until one of them drops a Wyvern Cage Key. Be prepared to do this for a while, as the drop rate is fairly low. Once someone has the key, the person with it needs to go to Leokk’s Cage (65.7, 20.2) and stand beneath it. To find the cage, stand at the big bonfire in the middle of the camp, then look north and up. Then, the person with the key uses Spirit’s Whistle to complete
- Catch a wyvern to Mok’nathal Village and speak with Spiritcaller Dohgar to turn in There Can Be Only One Response.
- Take the road south from the village, and go right at the fork to find the cave at (71.7, 69.7). Go through the cave to reach Death’s Door:
- Once you’re in Death’s Door, right-click your Druid Signal (it’s like a bat-signal, but for druids). A druid will swoop down to you, speak with them to turn in Death’s Door and accept Harvesting the Fel Ammunition. Now, start killing Demons until you’ve collected 5 Fel Cannonballs — note that the Fel Terrors don’t drop them, since dogs can’t carry cannonballs. Once you’ve got all 5, use the Druid Signal again and speak with the druid to turn in Harvesting the Fel Ammunition, accept Fire At Will!
- Find the Death’s Door Fel Cannon (64.8, 68.5). It looks like the regular fel cannons, but these ones don’t attack. Make sure you clear any roaming enemies around it. Once you start using it, there will be waves of enemies flooding out of the warp-gate, so make sure you’re ready. The cannon will also use your pet bar, so you won’t be able to use a pet during this part. If you’ve hidden your pet bar with an add-on, Shift-P should bring it up, and/or the default hotkeys for it are control + 1-9; you’ll mostly just need to use ability #4 here. Also note that you can heal the cannon. Clear around the cannon when you’re ready, and right-click the Naturalized Ammunition you have to start. Use the Artillery on the Warp-Gate ability in your pet bar every time it’s off cool-down, and defend the cannon from the mobs that attack. The cannon has decent HP, so you can let it tank if you need to eat/drink or heal.
- Now clear north to the Death’s Door Fel Cannon (62.2, 60.3) there, and do the same thing as in step 26.2 above. When you’ve destroyed that warp-Gate as well, use the Druid Signal again and turn in Fire At Will!, accept The Hound-Master.
- Go north, and clear the enemies near Baelmon the Hound-Master (63.7, 59). Then get full hp/mana and use your Evergrove Wand on Baelmon. Let the treants that spawn tank, and this should be easy if you don’t get aggro. When finished, hearthstone to Evergrove.
- Once you’re in Death’s Door, right-click your Druid Signal (it’s like a bat-signal, but for druids). A druid will swoop down to you, speak with them to turn in
- In Evergrove, see Wildlord Antelarion to turn in The Hound-Master. Then, when you’re ready to leave Blade’s Edge Mountains, take the road from town east, then go left at the fork to enter the Netherstorm.
Extra XP in Blade’s Edge Mountains
There isn’t any. The only dungeon is a 25+ man raid that requires level 70, and there are no notable spots to grind mobs.


About the Author

DanielD
An avid reader of sci-fi, fantasy, and history. Believes disagreement should mean discourse, not flame wars. Still searching for that next game that grabs him the way (those mimics in) Dark Souls did.


